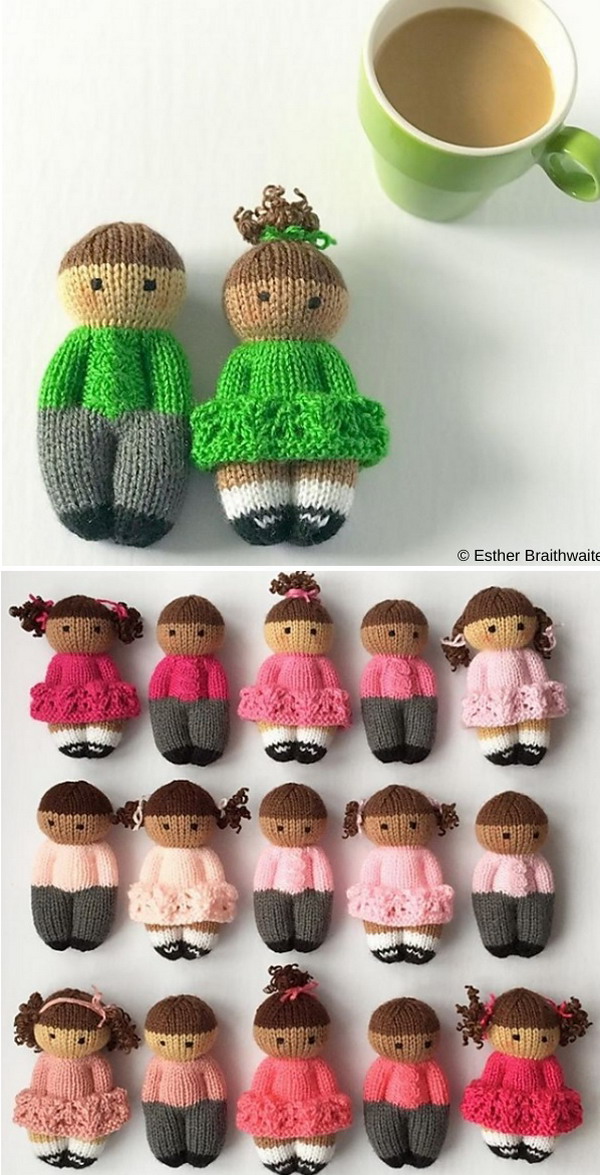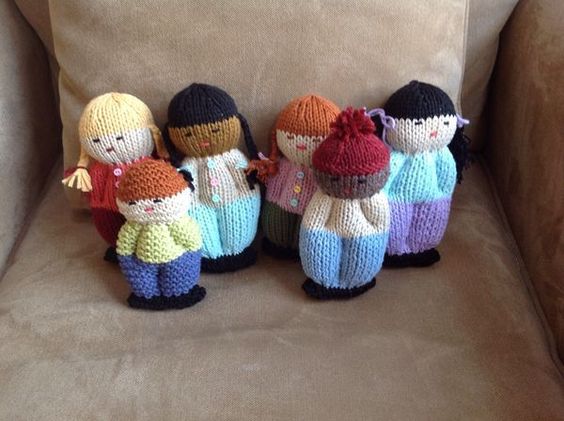
A sweet, traditional-style comfort doll knitted flat on straight needles, inspired by the colorful handmade dolls shown in the photo. The body is worked as one continuous piece from the feet upward, with simple color changes creating the shoes, pants, sweater, face, and hair or hat. After knitting, the rectangle is folded and seamed at the back, then lightly stuffed and shaped with yarn ties and simple embroidery.
Skill level: Advanced beginner
Finished size: Approximately 6-7 in (15-18 cm), depending on yarn, tension, and stuffing
Construction: Flat knitting on straight needles; one continuous body piece
Materials and Tools
Yarn
Use smooth DK/light worsted acrylic or wool-blend yarn. Small amounts are sufficient.
- Dark yarn: black, navy, charcoal, or dark brown for shoes
- Pants color: blue, purple, green, pink, or another bright shade
- Sweater color: contrasting bright color
- Skin-tone yarn: choose a natural shade such as:
- cream
- peach
- light brown
- medium brown
- deep brown
- Hair/hat color: black, brown, blonde, auburn, gray, or another contrasting shade
- Small scraps of white, pink, red, or other colors for clothing details
Needles and Notions
- 1 pair of 3.0-3.75 mm straight knitting needles (US 3-5)
- Polyester fiberfill
- Tapestry needle
- Small sharp embroidery needle
- Matching sewing thread or yarn
- Small buttons for decorative clothing details
- Scissors
- Stitch marker or safety pin
- Optional crochet hook for attaching yarn hair
Important: If the doll will be given to a very young child, avoid loose buttons and other detachable decorations. Embroidered details are the safer choice.
Abbreviations
The pattern uses standard US/UK-compatible knitting abbreviations.
| Abbreviation | Meaning |
|---|---|
| CO | Cast on |
| BO | Bind off |
| K | Knit |
| P | Purl |
| St / Sts | Stitch / Stitches |
| St st | Stockinette stitch |
| Garter st | Knit every row |
| K2tog | Knit 2 stitches together |
| P2tog | Purl 2 stitches together |
| Inc | Increase |
| Dec | Decrease |
| Tog | Together |
| RS | Right side |
| WS | Wrong side |
| Rep | Repeat |
| Beg | Beginning |
Stockinette stitch: Knit on RS rows and purl on WS rows.
Gauge: Exact gauge is not critical for this project. Aim for a firm fabric that will not allow stuffing to show through. If your knitting is loose, use smaller needles.
Part 1: Main Continuous Body
The complete doll is knitted as one flat piece from the bottom upward.
Do not cut the yarn between every color section unless necessary. At each color change, twist the new yarn around the old yarn once on the wrong side to prevent a hole.
Color Map
- Rows 1-6: Shoe Color
- Rows 7-22: Pants Color
- Rows 23-38: Sweater/Shirt Color
- Rows 39-48: Skin Color
- Rows 49-63: Hair or Hat Color
This creates a compact doll with a defined outfit and shaped crown.
Step 1: Shoes
Using your dark shoe color, CO 36 sts.
Rows 1-6 - Garter Stitch
Rows 1-6: K across - 36 sts
Do not purl these rows. Knitting every row creates a sturdy garter-stitch shoe section with a slightly thicker texture.
At the end of Row 6, change to your pants color.
Step 2: Pants
Work the pants in stockinette stitch.
Rows 7-22
Row 7 (RS): K36
Row 8 (WS): P36
Continue in St st through Row 22.
For clarity:
- Row 7: K36
- Row 8: P36
- Row 9: K36
- Row 10: P36
- Row 11: K36
- Row 12: P36
- Row 13: K36
- Row 14: P36
- Row 15: K36
- Row 16: P36
- Row 17: K36
- Row 18: P36
- Row 19: K36
- Row 20: P36
- Row 21: K36
- Row 22: P36
Stitch count: 36 sts
Change to the sweater/shirt color.
Optional Pant Variation
For a more colorful doll like the dolls in the photograph, use a contrasting yarn for each leg when sewing the leg division later. The pants themselves remain one continuous knitted section.
Step 3: Sweater or Shirt
Continue working upward in stockinette stitch.
Rows 23-38
Row 23: K36
Row 24: P36
Row 25: K36
Row 26: P36
Row 27: K36
Row 28: P36
Row 29: K36
Row 30: P36
Row 31: K36
Row 32: P36
Row 33: K36
Row 34: P36
Row 35: K36
Row 36: P36
Row 37: K36
Row 38: P36
Stitch count: 36 sts
Change to your chosen skin-tone yarn.
Simple Clothing Details
The sweater can remain plain, or you can add details after assembly:
- Tiny embroidered flowers
- Stripes
- A small heart
- A belt
- Embroidered buttons
- Tiny stitched pockets
For the look of the photographed dolls, keep the decoration small and colorful rather than heavily embellished.
Step 4: Face
The face is deliberately short so that the doll retains the characteristic compact proportions.
Rows 39-48 - Skin Color
Row 39: K36
Row 40: P36
Row 41: K36
Row 42: P36
Row 43: K36
Row 44: P36
Row 45: K36
Row 46: P36
Row 47: K36
Row 48: P36
Stitch count: 36 sts
Do not add facial features while the piece is still flat unless you are very comfortable positioning embroidery. It is easier to place the eyes and mouth after the body has been seamed, stuffed, and shaped.
Change to your hair or hat color.
Step 5: Hair or Hat Top
The final section forms the crown of the doll.
Use:
- Black for black hair
- Brown for brown hair
- Golden or pale yellow for blonde hair
- Auburn for red hair
- Gray for silver/gray hair
- A bright color for a knitted hat
Rows 49-52
Rows 49-52: Work in St st, maintaining 36 sts.
Crown Shaping
The following decreases gradually narrow the top of the head.
Row 53 - Dec Row
K2, K2tog; repeat from beginning to end - 30 sts
Row 54
P30
Row 55 - Dec Row
K3, K2tog; repeat from beginning to end - 24 sts
Row 56
P24
Row 57 - Dec Row
K2, K2tog; repeat from beginning to end - 18 sts
Row 58
P18
Row 59 - Dec Row
K1, K2tog; repeat from beginning to end - 12 sts
Row 60
P12
Row 61 - Dec Row
K2tog across - 6 sts
Row 62
P6
Row 63
K2tog 3 times - 3 sts
Cut the yarn, leaving an approximately 10-12 in (25-30 cm) tail.
Thread the tail through the remaining 3 sts, slip them off the needle, and pull firmly to close the crown.
Secure the yarn on the wrong side, but leave enough tail for finishing if needed.
Part 2: Head and Waist Shaping
The shaping is what transforms the simple knitted rectangle into the rounded, traditional comfort-doll silhouette.
Step 1: Sew the Back Seam
Place the knitted piece right sides together.
Align the two long side edges carefully.
Using matching yarn and a tapestry needle, sew the entire long edge from the bottom of the shoes to the top of the head.
Use mattress stitch or small neat whip stitches.
Turn the tube right side out.
You now have a long, narrow knitted tube with:
- shoes at the bottom
- pants above the shoes
- sweater in the middle
- skin-colored head
- hair or hat at the top
Step 2: Close and Shape the Head
Lightly stuff the head with polyester fiberfill.
Do not overstuff it. The head should be soft and slightly rounded rather than hard.
Locate approximately Row 39, the first row of skin-colored knitting.
Thread a strand of matching skin-tone yarn through the stitches around the doll at this level.
Bring the two ends together and gently pull.
The fabric will gather inward, forming the neck.
Tie the yarn securely on the back of the doll.
Neck Tip
Do not pull so tightly that the stitches distort. The neck should be clearly defined but still soft.
Step 3: Stuff the Body
Add small amounts of fiberfill through the bottom opening.
Work gradually upward.
Recommended stuffing order
- Head
- Upper body
- Waist
- Pants
- Shoes
Use a knitting needle, stuffing tool, or blunt end of a crochet hook to gently distribute the fiberfill.
Avoid packing the stuffing too firmly because the classic comfort-doll shape is soft and squeezable.
Step 4: Define the Waist
Thread a strong strand of matching yarn through the stitches around the waist, approximately 2-3 rows below the sweater/pants color change.
Wrap the yarn around the body once.
Pull gently until the body narrows.
Tie securely at the back.
This creates the characteristic small-waisted doll shape.
If you want a more rounded body, use only a moderate amount of gathering.
Step 5: Define the Ankles
For each foot, thread a strand of matching dark yarn around the top edge of the shoe section.
Gently pull to create a small ankle.
Repeat for the second foot.
The shoes should remain slightly wider than the ankles, creating a simple boot-like silhouette.
Part 3: Hair Customization Guide
The basic pattern creates a hair-colored crown, but the hairstyle can be changed dramatically with a few simple techniques.
Option A: Straight Hair
This is ideal for the dark-haired and blonde dolls shown in the photograph.
Cut multiple lengths of yarn approximately:
4-5 in (10-13 cm) long.
Fold each strand in half.
Insert a crochet hook or tapestry needle into a stitch along the head.
Pull the folded loop halfway through.
Pass the loose ends through the loop.
Pull gently to secure.
Repeat across the hairline and around the sides and back of the head.
Trim the hair evenly.
For a fuller hairstyle, add more strands.
Option B: Braided Pigtails
For two pigtails:
- Add yarn hair to both sides of the head.
- Separate the yarn into two equal groups.
- Divide each group into three smaller sections.
- Braid each side.
- Secure the ends with small pieces of contrasting yarn.
- Trim the ends evenly.
For a childlike look, use bright pink, blue, yellow, or red ties.
Tip
Use slightly shorter yarn strands near the forehead and longer strands at the sides to create a natural rounded hairline.
Option C: Short Bob Hair
For the simple black, brown, or blonde-haired dolls:
- Cut 3-4 in (7.5-10 cm) lengths.
- Attach around the entire head.
- Keep the hair relatively dense at the crown.
- Trim the ends to approximately chin level.
This creates the soft, simple hairstyle visible on many traditional comfort dolls.
Option D: Knitted Beanie Topper
The front-right doll in the photograph has a distinctive knitted hat.
For a simple version, use a contrasting hat color instead of the hair color for Rows 49–63.
After closing the crown:
- Add a small amount of fiberfill beneath the hat if you want it slightly rounded.
- Make a small yarn pom-pom.
- Tie it securely to the top.
- Trim the pom-pom evenly.
Simple Pom-Pom
Wrap yarn around two or three fingers approximately 20-30 times.
Tie the center tightly.
Cut through the loops.
Fluff and trim into a small ball.
Attach securely to the crown.
Assembly + Face Details
Define the Arms
The arms are created directly on the finished body with embroidery-style backstitches rather than knitting separate pieces.
Turn the doll so the center-back seam is facing you.
Mark two vertical lines on the front of the body.
Each line should be approximately 7-8 stitches in from the side edge.
Starting at the waist, sew small, firm backstitches upward to approximately 3 rows below the bottom of the head.
Repeat on the other side.
These stitched lines divide the body into:
- left arm
- central body
- right arm
Do not stitch all the way through the stuffing with large loose stitches. Keep the stitches small and firm.
Define the Legs
The legs are also formed directly into the body.
Find the center of the bottom edge.
Using matching dark or pants-colored yarn, sew a straight vertical line upward from the center between the two shoes.
Continue approximately 2-3 rows above the pants/shirt boundary.
This divides the lower body into two legs.
Important
Keep the leg division centered.
If the line drifts to one side, the finished doll will appear uneven.
Closing the Bottom
Once the legs have been shaped and the body has been stuffed:
- Push a little fiberfill into each shoe.
- Fold the bottom edge inward.
- Sew the opening closed with matching dark yarn.
- Secure the yarn firmly.
- Hide the yarn tail inside the body.
The finished feet should remain soft and slightly rounded.
Embroidering the Face
The face should remain very simple, matching the gentle expression of the photographed dolls.
Sleepy Eyes
Use dark brown or black embroidery floss.
Place the eyes approximately 2-3 rows below the hairline.
For each eye, make a short horizontal or slightly curved stitch.
A simple sleepy-eye shape can be made with:
- 1 short curved stitch, or
- 2 tiny diagonal stitches meeting in the center.
Keep the eyes small and symmetrical.
Tiny Mouth
Using pink, dark rose, or brown embroidery floss:
- Make one tiny horizontal stitch beneath the eyes.
- Alternatively, make a very small curved stitch for a gentle smile.
Do not make the mouth too large.
The minimalist expression is part of the charm of this style of doll.
Optional Clothing Details
Personalize each doll with tiny embroidered details.
Sweater
Add:
- small flowers
- hearts
- stripes
- dots
- embroidered buttons
- a tiny collar
Pants
Add:
- contrasting cuffs
- tiny pockets
- embroidered patches
- a simple waistband
Shoes
Keep shoes dark for the classic look, or substitute:
- navy
- dark brown
- burgundy
- charcoal
- forest green
Finishing Checklist
Before considering the doll complete, check that:
- The back seam is secure.
- The crown is completely closed.
- The head is evenly stuffed.
- The neck is gathered firmly but not excessively.
- The waist is softly defined.
- Both arms are the same length.
- The leg division is centered.
- Both shoes contain enough stuffing to hold their shape.
- The bottom opening is completely closed.
- Eyes are level and symmetrical.
- The mouth is centered.
- Hair is securely attached.
- All decorative elements are firmly secured.
The result is a soft, colorful flat-knitted comfort doll with the simple proportions, cheerful clothing, defined waist.
Sailor Mouse in Brown Overalls with Nautical Accessories Free Knitting Pattern
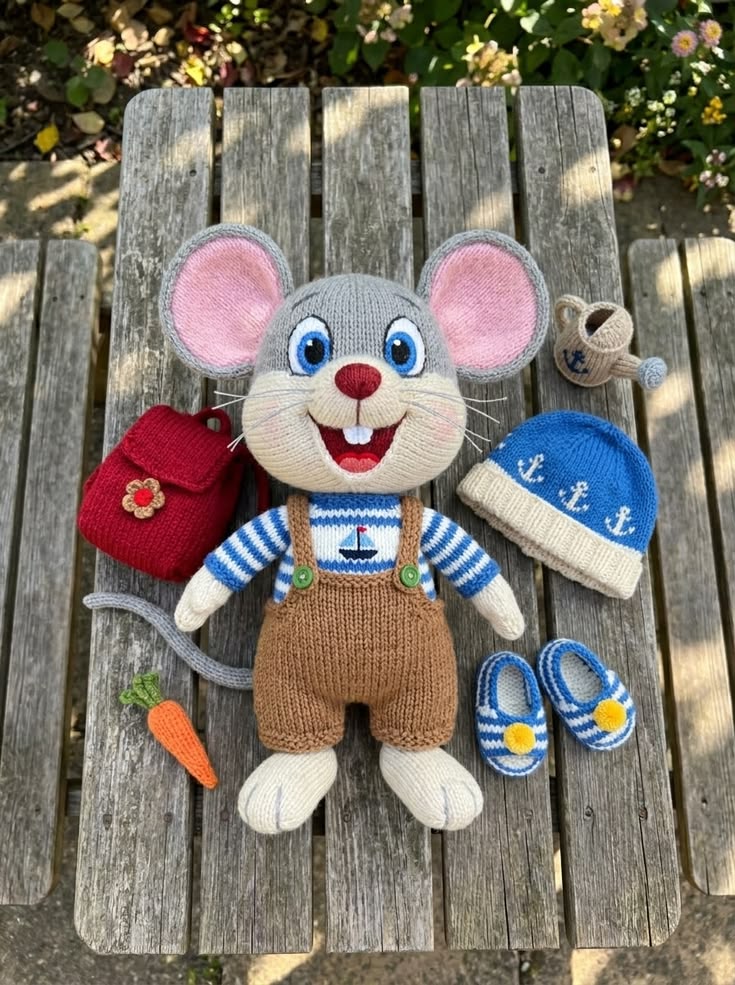
This cheerful knitted sailor mouse is made with a round gray head, large pink-lined ears, cream muzzle, striped sailor shirt, brown overalls, soft cream feet, and a curved gray tail. The set also includes a blue anchor beanie, striped slippers with yellow buttons, a red backpack, a tiny watering can, and a carrot, matching the playful nautical garden style shown in the photo.
Black and White Garden Kitten in Blue Floral Overalls Free Knitting Pattern
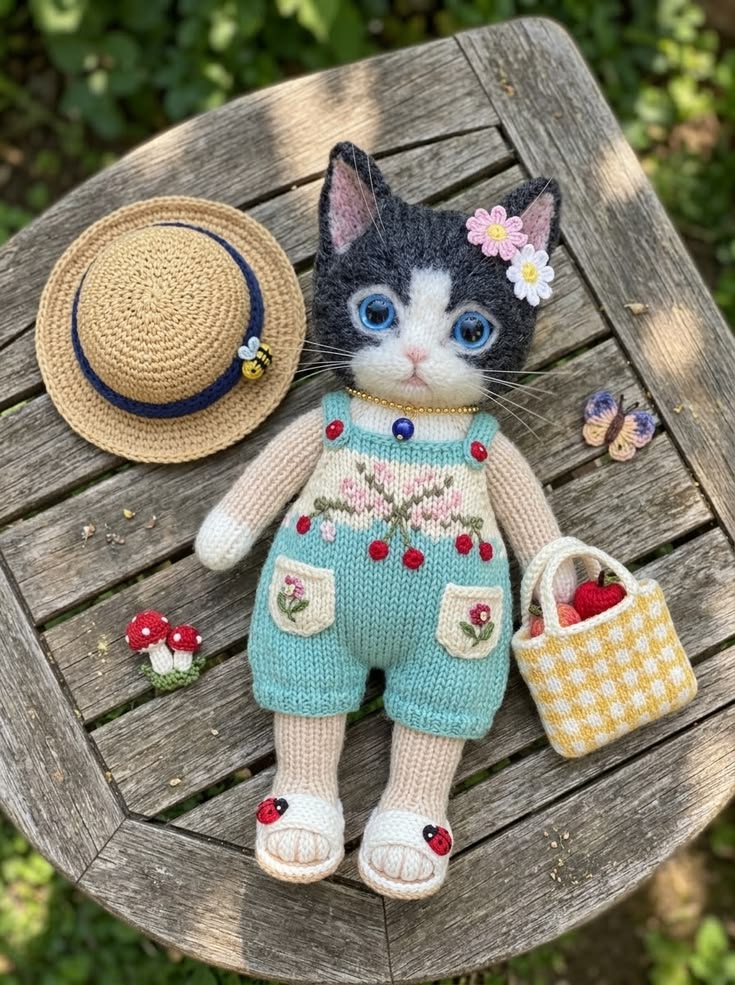
This sweet knitted garden kitten has a black-and-white tuxedo face, bright blue eyes, soft cream limbs, aqua-blue floral overalls, tiny embroidered pockets, white sandals with ladybug details, a straw sun hat with a navy band and bee, a yellow gingham basket filled with fruit, little mushrooms, flowers, and a butterfly accent.
Garden Kitten in Blue Floral Dress and Pink Bow Free Knitting Pattern
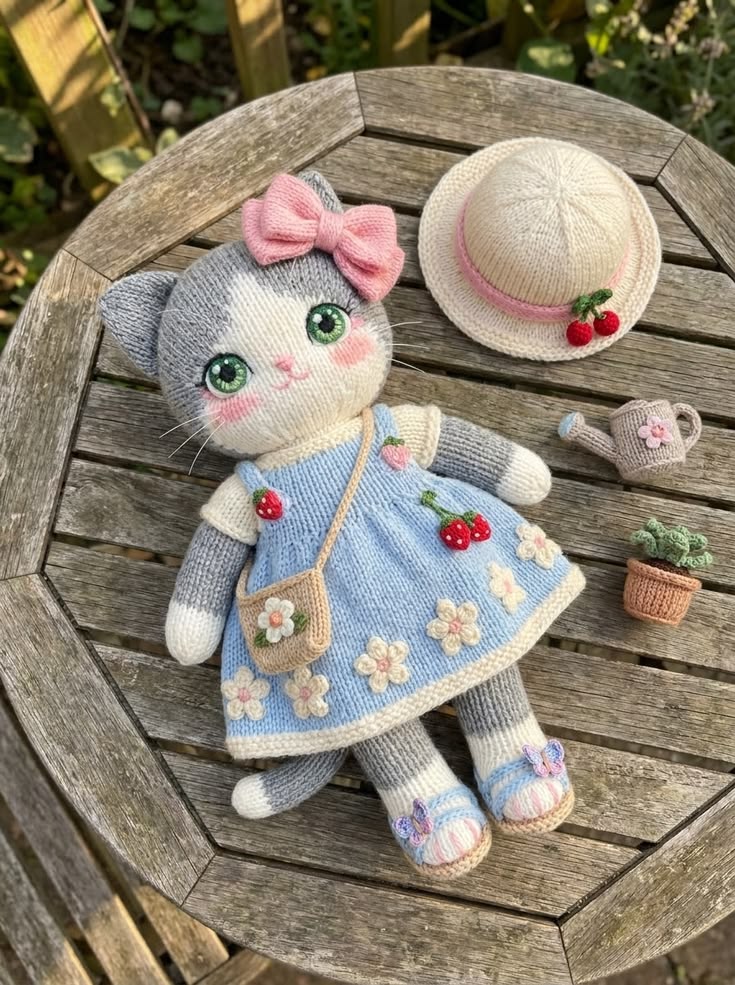
This sweet knitted garden kitten has a soft gray-and-cream body, rounded kitten head, green embroidered eyes, rosy cheeks, a large pink bow, and a flared blue floral dress. The outfit includes white sleeves, strawberry details, cream flower appliqués, a small crossbody bag, blue-trimmed shoes with butterflies, plus matching garden accessories: a cream sunhat with cherries, a tiny watering can, and a potted plant.
All in-one baby cardigan knitting pattern free
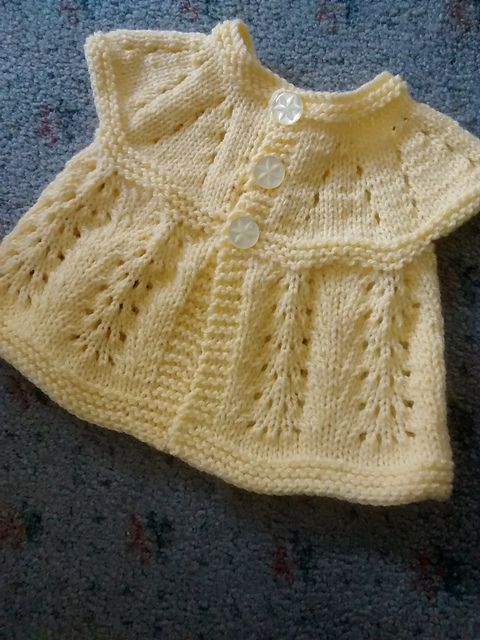
A sweet top-down baby matinee coat inspired by the classic vintage cardigan in the photo. This seamless design features a softly rounded lace-effect yoke, cap sleeves, decorative eyelet lines, a gently flared skirt, garter-stitch borders, and three buttonholes worked directly into the front band.
Pretty Izzy Dolls Free Knitting Pattern
- Designed by Esther Braithwaite
These lovely knitted toy Pretty Izzy Dolls look wonderful. Each one looks a little different, so you can make them look like your family member or friends! Isn't that great? What's more, you can also take a yellow and black yarn and create the right hair colors!