
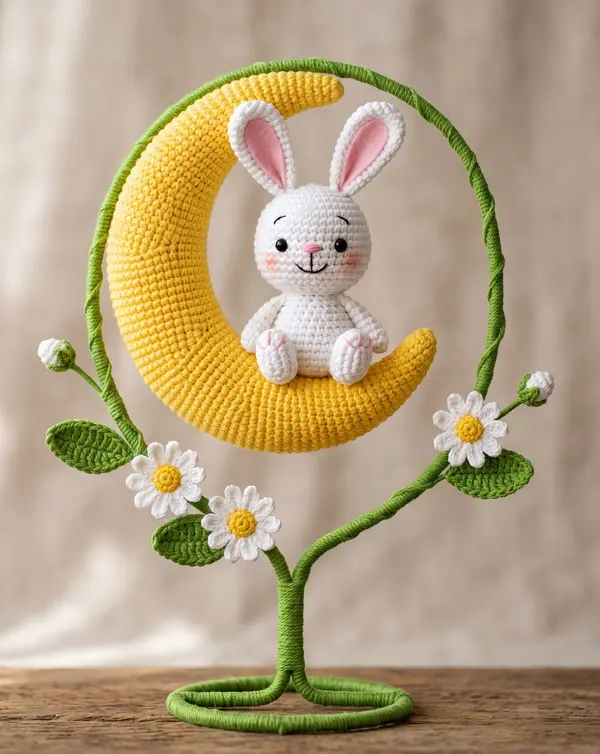
Amigurumi Moon Bunny Pattern - Whimsical Crochet Nursery Moon & Bunny Decor
Materials & Tools
Yarn
Use smooth sport or DK weight cotton/cotton-blend yarn for clearly defined stitches and a neat nursery-decor finish.
- White: approximately 80-100 g for the bunny, ears, flower petals, and moon accents
- Golden yellow: approximately 100-130 g for the crescent moon and flower centers
- Light pink: small amount for inner ears, nose, and toe details
- Leaf green: approximately 40-60 g for leaves, vines, buds, and wire wrapping
- Black: embroidery floss for facial details
Other Materials
- 8 mm black safety eyes
- Polyester fiberfill
- 1.5-2 mm craft wire or sturdy floral wire for the decorative frame
- Optional: floral tape
- Tapestry needle
- Embroidery needle
- Stitch marker
- Scissors
- Crochet hook suitable for your yarn, approximately 2.75-3.25 mm
- Wire cutters
- Round-nose pliers
- Fabric or masking tape for protecting sharp wire ends
- Blush makeup or pink yarn pastel for the cheeks
- Optional: a small amount of craft glue for securing the wrapped wire ends
Safety note: The finished decoration contains wire and small parts. Keep sharp wire completely covered and keep the finished piece away from young children who may pull on or chew the components.
Abbreviations
| Abbreviation | US Crochet Term |
|---|---|
| MR | Magic Ring |
| ch | Chain |
| sc | Single Crochet |
| hdc | Half Double Crochet |
| dc | Double Crochet |
| tr | Treble Crochet |
| inc | Increase - 2 sc in the same stitch |
| dec | Single Crochet Decrease |
| sl st | Slip Stitch |
| BLO | Back Loop Only |
| FLO | Front Loop Only |
| st/sts | Stitch/Stitches |
| Rnd | Round |
| FO | Fasten Off |
| YO | Yarn Over |
Pattern Notes
- Work amigurumi pieces in continuous rounds unless otherwise stated.
- Use a stitch marker to mark the first stitch of each round.
- Crochet tightly enough that stuffing cannot show through the fabric.
- Numbers in parentheses indicate the total stitch count at the end of the round.
- The finished bunny is approximately 14-16 cm (5½-6¼ in) tall, depending on yarn and hook size.
- The moon is approximately 25-30 cm (10-12 in) from tip to tip.
- The frame size can be adjusted to suit your intended display.
Part 1: The Sitting Bunny
The bunny is made from a rounded head, compact sitting body, floppy ears, short arms, and chunky little feet.
Bunny Head
Work in white.
Rnd 1
6 sc in MR. (6)
Rnd 2
Inc in each st around. (12)
Rnd 3
(sc, inc) around. (18)
Rnd 4
(2 sc, inc) around. (24)
Rnd 5
(3 sc, inc) around. (30)
Rnd 6
(4 sc, inc) around. (36)
Rnds 7-12
Sc in each st around. (36)
Safety Eye Placement
Insert the 8 mm safety eyes between Rnds 9 and 10, approximately 8 stitches apart.
For a symmetrical face:
- Count 4 stitches to either side of the center front.
- Place the eyes approximately 8 stitches apart.
- Make sure both eyes sit on the same horizontal round.
- Push the washers firmly onto the backs of the eyes.
Rnd 13
(4 sc, dec) around. (30)
Rnd 14
(3 sc, dec) around. (24)
Rnd 15
(2 sc, dec) around. (18)
Begin stuffing firmly but gently.
Rnd 16
(sc, dec) around. (12)
Add the remaining stuffing and shape the head into a smooth ball.
Rnd 17
Dec around. (6)
FO, leaving a long yarn tail. Weave through the remaining front loops, pull closed, and hide the yarn inside the head.
Bunny Body
Work in white.
Rnd 1
6 sc in MR. (6)
Rnd 2
Inc around. (12)
Rnd 3
(sc, inc) around. (18)
Rnd 4
(2 sc, inc) around. (24)
Rnd 5
(3 sc, inc) around. (30)
Rnds 6–10
Sc in each st around. (30)
Rnd 11
(3 sc, dec) around. (24)
Rnd 12
Sc in each st around. (24)
Rnd 13
(2 sc, dec) around. (18)
Stuff the body firmly, concentrating extra stuffing in the lower half so the bunny can sit upright.
Rnd 14
(sc, dec) around. (12)
Rnd 15
Dec around. (6)
FO and close the opening.
Shape the body into a slightly pear-shaped sitting form.
Bunny Ears
Make 2 ears in white.
Each ear is crocheted as a narrow oval and lightly stuffed or left mostly flat for the floppy appearance.
Outer Ear
Rnd 1
6 sc in MR. (6)
Rnd 2
Inc around. (12)
Rnd 3
(sc, inc) around. (18)
Rnds 4-8
Sc in each st around. (18)
Rnd 9
(4 sc, dec) around. (15)
Rnd 10
(3 sc, dec) around. (12)
Rnd 11
(2 sc, dec) around. (9)
Rnd 12
Sc in each st around. (9)
Rnd 13
(Sc, dec) around. (6)
FO.
Do not heavily stuff the ears. Flatten them gently between your fingers.
Pink Inner Ear
Make 2 in pink.
Row 1
Ch 8.
Row 2
Sc in 2nd ch from hook, sc across. (7)
Row 3
Dec, 5 sc. (6)
Row 4
Dec, 4 sc. (5)
Row 5
Dec, 3 sc. (4)
Row 6
Dec, 2 sc. (3)
Row 7
Dec, sc. (2)
Row 8
Dec. (1)
FO.
The finished inner ear should be slightly smaller than the white outer ear.
Position each pink insert vertically down the center of the white ear and stitch it neatly into place with matching pink yarn.
For the photograph-style appearance, keep the pink section narrow at the top and slightly wider through the center.
Attaching the Ears
Position the ears on the top of the head approximately 7-8 stitches apart.
Angle them slightly outward.
Stitch the lower 2-3 cm of each ear securely to the head. Allow the upper portions to remain flexible so they naturally flop outward.
Bunny Arms
Make 2 in white.
Rnd 1
6 sc in MR. (6)
Rnd 2
Inc around. (12)
Rnds 3-8
Sc in each st around. (12)
Lightly stuff the lower half.
Rnd 9
(2 sc, dec) around. (9)
Rnd 10
Sc in each st around. (9)
FO and leave a sewing tail.
Flatten the top opening slightly.
Position each arm on the sides of the body, approximately between Rnds 6 and 11.
Sew securely in place with the arms angled slightly forward, as shown in the reference design.
Bunny Feet
Make 2 in white.
The feet should be wider and shorter than the arms.
Rnd 1
6 sc in MR. (6)
Rnd 2
Inc around. (12)
Rnd 3
(sc, inc) around. (18)
Rnds 4-6
Sc in each st around. (18)
Rnd 7
(4 sc, dec) around. (15)
Rnd 8
Sc in each st around. (15)
Lightly stuff.
Rnd 9
(3 sc, dec) around. (12)
Rnd 10
Sc in each st around. (12)
Rnd 11
(2 sc, dec) around. (9)
FO.
Close the opening.
Flatten the back of each foot slightly.
Position the feet at the lower front of the body so the bunny appears to be sitting naturally on the moon.
Pink Toe Details
Using pink embroidery floss, create three short curved toe lines on the front of each foot.
- Place the lines vertically.
- Keep them close together.
- Use 2-3 small stitches for each toe line.
- Do not pull the floss too tightly.
The toe embroidery should remain delicate and subtle.
Bunny Face Embroidery
Nose
Using pink embroidery floss, embroider a tiny horizontal oval or rounded triangular nose centered approximately 2 rounds below the eyes.
Make 3-5 small horizontal stitches to build the nose.
Mouth
Using black embroidery floss:
- Bring the needle out directly below the pink nose.
- Make one short vertical stitch downward.
- Add two tiny diagonal stitches outward to create a soft Y-shaped smile.
Keep the smile small.
Eyebrows
Using black embroidery floss, embroider one short curved eyebrow above each eye.
Place them approximately 2 rounds above the eyes.
The eyebrows should be very subtle just 2-3 tiny stitches each.
Cheeks
Apply a small amount of soft pink blush to each cheek.
Place the blush:
- Below and slightly outside each eye
- Above the widest part of the muzzle
- Symmetrically on both sides
Use a dry brush or cotton swab and build the color gradually.
Part 2: The Crescent Moon
The moon is designed as a continuous stuffed crescent tube. It begins at the upper tip, expands through the middle, curves around the body of the crescent, and then gradually tapers toward the lower tip.
Work in golden yellow.
Important Construction Note
The increases and decreases are deliberately positioned asymmetrically. This shifts the center of the tube and creates the characteristic crescent curve rather than producing a straight sausage shape.
Keep stuffing evenly as you work.
Crescent Moon
Rnd 1
6 sc in MR. (6)
Rnd 2
Inc around. (12)
Rnd 3
(sc, inc) around. (18)
Rnd 4
(2 sc, inc) around. (24)
Rnd 5
(3 sc, inc) around. (30)
Rnd 6
(4 sc, inc) around. (36)
Rnd 7
Sc in each st around. (36)
Rnd 8
12 sc, inc, 17 sc, dec, 5 sc. (36)
Rnd 9
13 sc, inc, 17 sc, dec, 5 sc. (36)
Rnd 10
14 sc, inc, 17 sc, dec, 4 sc. (36)
Rnd 11
15 sc, inc, 17 sc, dec, 3 sc. (36)
Rnd 12
16 sc, inc, 17 sc, dec, 2 sc. (36)
Rnd 13
17 sc, inc, 17 sc, dec, sc. (36)
Rnd 14
18 sc, inc, 17 sc, dec. (36)
The moon is now beginning to bow inward.
Rnds 15-22
Sc in each st around. (36)
Continue gently curving the piece as you crochet.
Rnd 23
17 sc, dec, 17 sc, inc. (36)
Rnd 24
16 sc, dec, 17 sc, inc, 2 sc. (36)
Rnd 25
15 sc, dec, 17 sc, inc, 3 sc. (36)
Rnd 26
14 sc, dec, 17 sc, inc, 4 sc. (36)
Rnd 27
13 sc, dec, 17 sc, inc, 5 sc. (36)
Rnd 28
12 sc, dec, 17 sc, inc, 6 sc. (36)
These opposite shaping points help the lower section sweep inward.
Rnd 29
(4 sc, dec) around. (30)
Rnd 30
Sc in each st around. (30)
Rnd 31
(3 sc, dec) around. (24)
Rnd 32
Sc in each st around. (24)
Rnd 33
(2 sc, dec) around. (18)
Rnd 34
Sc in each st around. (18)
Begin adding the final stuffing. The moon should be firm but not hard.
Rnd 35
(sc, dec) around. (12)
Rnd 36
Sc in each st around. (12)
Rnd 37
Dec around. (6)
FO, leaving a long tail.
Weave the tail through the remaining stitches, pull tightly, and close the opening.
Shaping the Crescent
Before attaching the moon to the frame:
- Gently bend the finished piece into a crescent.
- The middle should be the thickest section.
- The upper and lower tips should point slightly inward.
- Keep the outer curve smooth.
- Avoid sharply folding the crochet fabric.
If necessary, use your hands to redistribute the stuffing.
The finished moon should resemble a broad C-shaped crescent, with enough flat inner surface for the bunny to sit securely.
Part 3: Daisies & Leaves
Small Daisy
Make several flowers in white and yellow.
White Petals
With white yarn, make a slip knot.
Petal 1
Ch 4.
Starting in the 2nd ch from hook:
Sc, hdc, dc, sl st into the starting point.
Petal 2
Ch 4.
Sc, hdc, dc, sl st into the starting point.
Petals 3-5
Repeat the same construction three more times, placing each petal evenly around the center.
You will have 5 petals.
FO and leave a long tail.
Yellow Flower Center
With yellow yarn:
Rnd 1
6 sc in MR. (6)
Rnd 2
Inc around. (12)
FO.
Place the yellow center over the middle of the white petals and stitch it securely.
For a more textured flower, work the second round in FLO and slightly cup the center.
Larger Daisy Variation
For the larger flowers visible on the vine, use 6 petals instead of 5.
For each petal:
Ch 5, then starting in the 2nd ch from hook, sc, hdc, dc, dc, sl st into the center.
Repeat around for 6 petals.
Add a small yellow center using:
6 sc in MR, then FO and attach.
Green Leaves
Make as many leaves as needed for the vine.
Ribbed Leaf
With green yarn:
Row 1
Ch 10.
Starting in the 2nd ch from hook:
Sc, hdc, dc, dc, tr, dc, dc, hdc, sc. (9)
Do not turn.
Row 2
Working down the opposite side of the foundation chain:
Sc, hdc, dc, dc, tr, dc, dc, hdc, sc. (9)
Sl st into the base.
FO.
Leaf Vein
Using green yarn, make a line of slip stitches through the center of the leaf from the tip toward the base.
This gives the leaf the raised ribbed appearance seen in the reference.
For smaller leaves, use ch 7 and shorten the stitch sequence proportionally.
Tiny Flower Buds
For the small buds along the outer vine:
With white yarn:
Rnd 1
6 sc in MR. (6)
Rnd 2
Sc in each st around. (6)
Rnd 3
Dec around. (3)
FO and lightly stuff.
Close the opening.
Add a tiny green cap or wrap several stitches of green yarn around the bottom of the bud.
Part 4: The Wire Frame Stand
The stand creates the distinctive botanical nursery-display silhouette.
Frame Design
The frame consists of:
- A large rounded/oval upper ring
- A central stem
- A curved lower support
- A flat oval base
- Decorative branches extending from the stem
A sturdy floral or craft wire of approximately 1.5-2 mm works well.
Step 1: Form the Main Ring
Cut a long piece of wire approximately 80-100 cm (31-39 in) long.
Using your hands and round-nose pliers, shape the wire into a large rounded oval or circle approximately:
25-30 cm (10-12 in) wide.
Do not make the ring perfectly geometric. A slightly organic shape complements the flowers and vines.
Twist the two wire ends together at the bottom center.
Cover the twisted connection completely with green floral tape.
Step 2: Create the Stem
Cut a second length of sturdy wire approximately 50-60 cm (20-24 in) long.
Position it vertically beneath the ring.
Wrap the wire around the bottom center of the ring several times.
Use pliers to tighten the connection.
The stem should extend downward from the ring toward the base.
Step 3: Form the Base
Use another long piece of wire to create a wide oval base.
Aim for approximately:
20-25 cm (8-10 in) wide.
Cross the wire ends at the back or center.
Twist securely around the main stem.
The finished base should sit flat on a table.
If the stand rocks, reshape the bottom oval until all major contact points touch the surface.
Wrapping the Wire With Green Yarn
The green yarn gives the metal structure the appearance of a crocheted vine.
Apply a tiny amount of craft glue or double-sided tape to the starting point.
Attach green yarn to the bottom of the frame.
Wrap the yarn tightly around the wire, keeping each wrap close against the previous one.
Important
- Do not leave metal exposed.
- Keep the yarn tension consistent.
- Push the wraps together periodically.
- Cover all twisted joints.
- Add an extra layer around the base and ring attachment points.
When you reach a branch junction, continue wrapping the main stem before wrapping the branch.
At the end, secure the yarn with a tight knot and hide the tail under several previous wraps.
Decorative Branches
Cut smaller lengths of wire and curve them outward from the central stem.
Create:
- One branch toward the left
- One branch toward the right
- Optional smaller upward branches
Wrap each branch completely with green yarn.
The branches should remain slightly curved rather than perfectly straight.
Creating the Vine Look
For an especially polished finish, wrap green yarn around selected sections of the ring in a spiral rather than using completely straight wraps.
Leave the underlying ring visible only where desired.
Attach crocheted leaves at natural branch points.
Arrange the flowers so the design feels balanced:
- One larger daisy toward the lower left
- One medium flower near the center-left
- One flower toward the lower right
- Several leaves surrounding the flowers
- Small white buds farther along the vine
This asymmetrical arrangement gives the stand a handmade botanical appearance.
Assembly & Finishing
Attach the Bunny to the Moon
Place the bunny in the lower-middle portion of the crescent.
The bunny should sit inside the curve, with its feet resting naturally against the moon.
Check the position from the front before sewing.
Using white yarn and a tapestry needle:
- Secure the lower body to the moon.
- Stitch through the bottom of the body and into the moon.
- Add several stitches beneath each foot.
- Add additional stitches behind the bunny if necessary.
Do not pull the stitches excessively tight because this can distort the moon.
The bunny should look as though it is naturally sitting on the crescent.
Secure the Moon to the Frame
Place the crescent inside the upper wire ring.
Center the moon vertically.
The moon should not touch the outer ring.
Use matching yellow yarn to create discreet attachment points.
Recommended attachment locations:
- Upper moon tip
- Lower moon tip
- One point near the middle back
- Optional additional point on the opposite side
Wrap yellow yarn around both the moon and the yarn-covered wire.
Tie securely at the back.
Hide the knots inside the moon or underneath the green frame wrapping.
Check the Crescent Position
View the piece straight on.
The moon should:
- Remain centered inside the ring
- Have its upper tip pointing slightly inward
- Have its lower tip sweeping upward
- Support the bunny without sagging
If the moon tilts, add a discreet support stitch at the opposite side.
Attach the Daisies
Arrange the flowers before permanently sewing them.
Once you are happy with the composition, stitch each flower directly to the green yarn-covered branches.
Use green yarn where possible so the attachment points disappear into the vine.
For each flower:
- Position the flower.
- Bring the needle from the back of the vine.
- Stitch through the flower center.
- Pass back through the vine.
- Repeat several times.
- Knot securely behind the vine.
- Hide the yarn tail inside the green wrapping.
Attach the Leaves
Place leaves at alternating angles.
Avoid arranging every leaf in the same direction.
For a natural botanical appearance:
- Angle some leaves upward.
- Angle others downward.
- Place a few leaves beside flowers.
- Add smaller leaves toward the branch tips.
Secure each leaf with green yarn through its base.
Add the Flower Buds
Attach the small white buds toward the ends of the branches.
Wrap green yarn around the bottom of each bud and the wire several times.
This creates the appearance of a tiny unopened flower growing directly from the vine.
Final Bunny Details
Give the bunny its final expression.
Check that:
- Both 8 mm eyes are level.
- The pink nose is centered.
- The smile is symmetrical.
- The eyebrows are subtle.
- The ears lean naturally outward.
- Both feet sit evenly.
- Pink toe lines are visible.
- The cheeks have matching amounts of blush.
Gently shape the ears and arms with your fingers.
Final Frame Inspection
Before displaying the finished piece, carefully inspect every part of the wire frame.
There should be:
- No exposed sharp wire
- No loose wire ends
- No unstable joints
- No rocking base
- No loose yarn wrapping
- No flowers that can easily detach
Add another layer of green yarn wherever metal is visible.
For a permanent home-decor piece, a small amount of glue can be applied beneath the final yarn wrap at major structural joints.
Finished Amigurumi Moon Bunny
Your finished piece combines a soft sitting bunny, dimensional golden crescent moon, delicate daisies, ribbed leaves, and a hand-wrapped botanical wire stand into one whimsical nursery decoration.
For the closest look to the reference image, keep the crochet fabric tightly stitched, use smooth cotton or cotton-blend yarn, make the moon substantially larger than the bunny, and arrange the green branches asymmetrically around the lower half of the frame.
Crocheted Giraffe
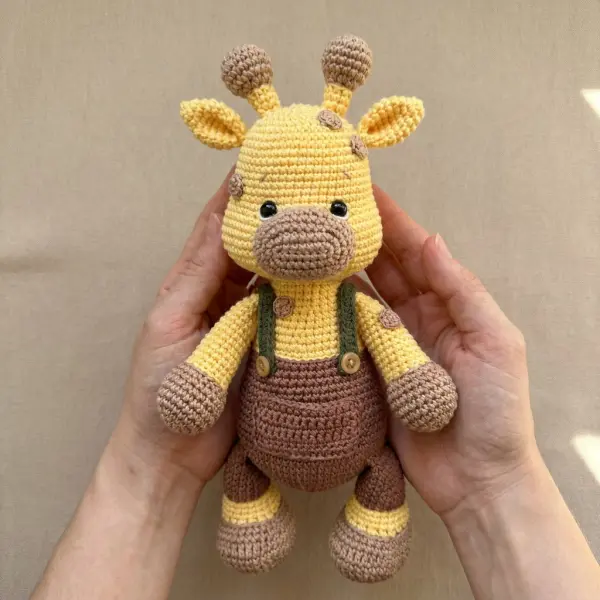
This adorable crocheted giraffe is a fun, beginner-friendly amigurumi project inspired by the sweet handmade giraffe in the photo. With a round head, tiny muzzle, floppy ears, tall ossicones, chunky legs, and cute little overalls, this plush has an irresistibly squishy personality.
The pattern is designed for quick crafting and simple construction. Most of the major pieces are worked directly onto the body with crochet stitches or slip stitches, keeping assembly to a minimum. There is no complicated garment sewing or difficult shaping.
Crocheted Elephant
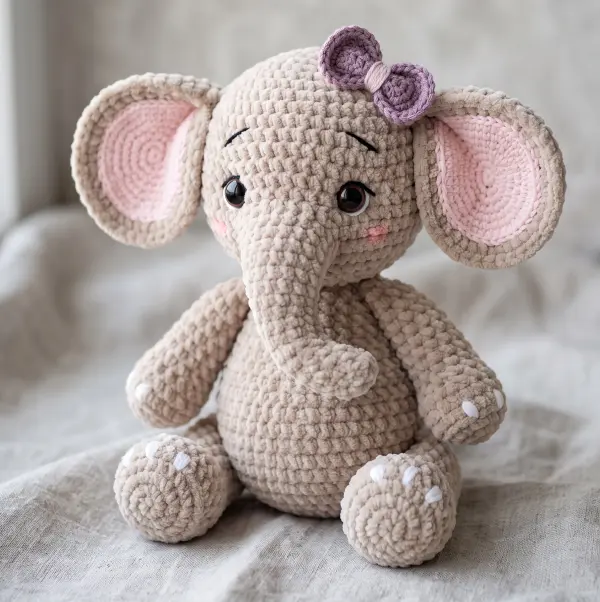
A soft, chubby, squishy crocheted elephant is one of those projects that is almost impossible to resist. With its oversized ears, tiny trunk, round belly, and cuddly chenille texture, this little elephant has the perfect handmade-toy look.
This beginner-friendly pattern is designed for quick crafting with plush yarn. The construction keeps the assembly simple, with parts attached using crochet stitches and slip stitches instead of traditional sewing. That makes it especially appealing if you love no-sew amigurumi and want a project you can finish in a short crafting session.
Easy No-Sew Crochet Minion Pattern
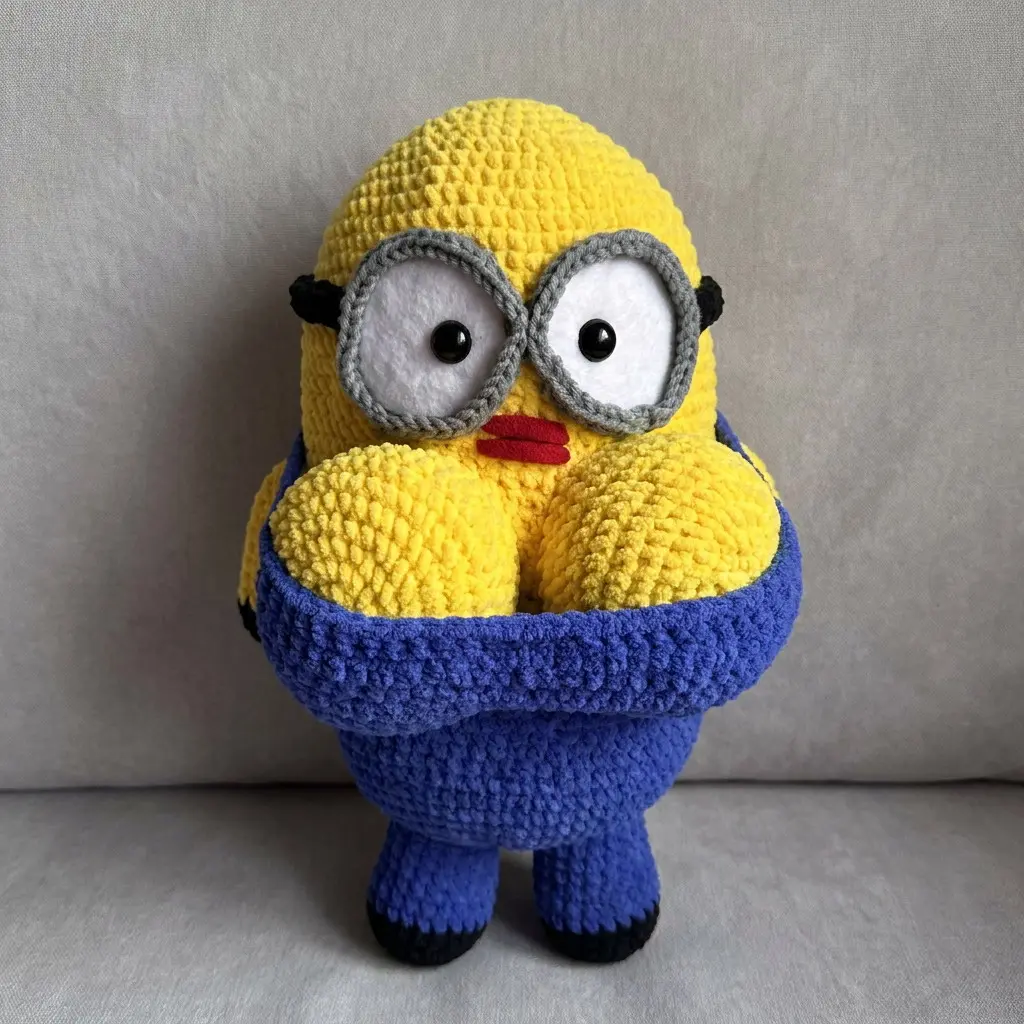
Easy No-Sew Crochet Minion Pattern - Chunky Plush Character-Inspired Amigurumi
Amigurumi Snake Crochet Free Pattern
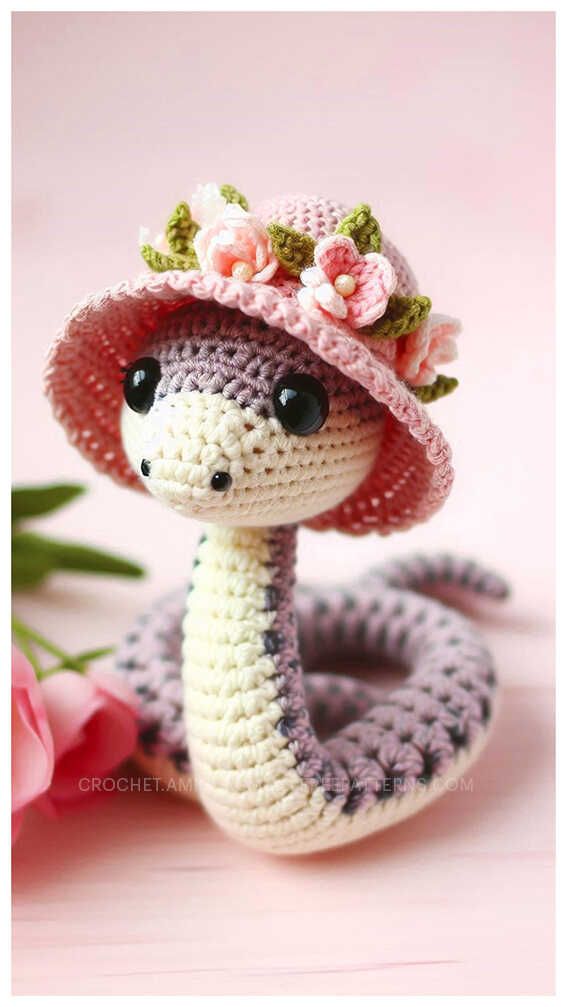
Create an irresistibly sweet coiled pastel snake amigurumi with a soft cream belly, oversized glossy eyes, tiny embroidered nostrils, and a charming pink sun hat covered in miniature flowers and leaves. This elegant snake is worked primarily in continuous rounds and designed for advanced beginners to intermediate crocheters familiar with amigurumi shaping and color changes.
African flower crochet elephant free pattern
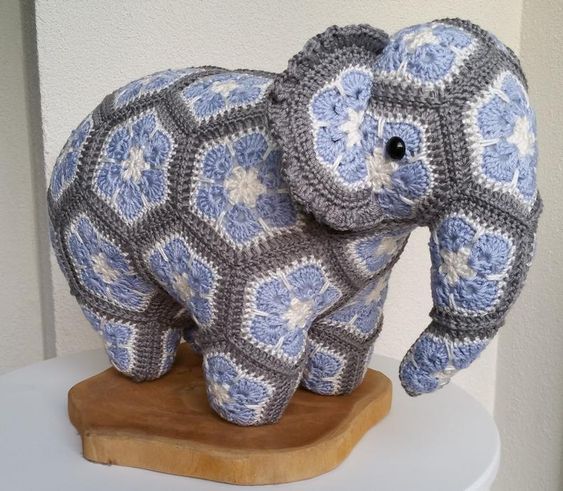
Materials and Tools
Yarn
Use a smooth, tightly spun sport or DK-weight cotton/cotton-blend yarn so the motifs remain crisp after joining and stuffing.
- Gray: approximately 100-120 g - outer framing, joining, and structural seams
- Light blue: approximately 70-90 g - flower petals
- Cream/white: approximately 40-60 g - flower centers and petal outlines
- Total: approximately 220-270 g
The exact amount will vary according to yarn brand, tension, and finished size.