
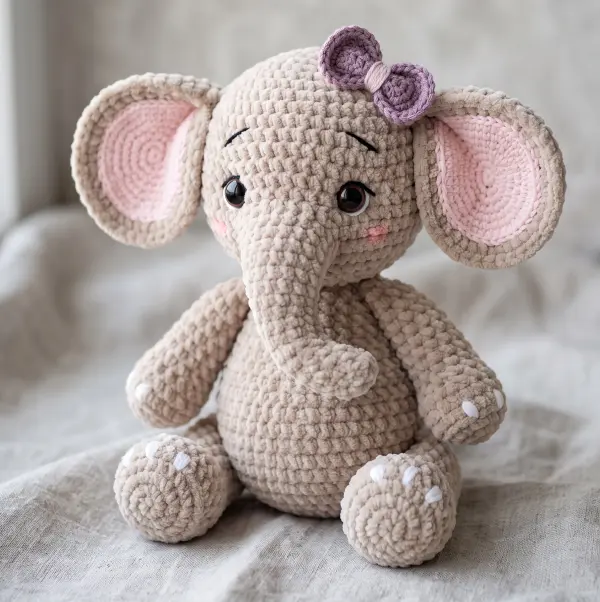
A soft, chubby, squishy crocheted elephant is one of those projects that is almost impossible to resist. With its oversized ears, tiny trunk, round belly, and cuddly chenille texture, this little elephant has the perfect handmade-toy look.
This beginner-friendly pattern is designed for quick crafting with plush yarn. The construction keeps the assembly simple, with parts attached using crochet stitches and slip stitches instead of traditional sewing. That makes it especially appealing if you love no-sew amigurumi and want a project you can finish in a short crafting session.
The finished elephant has the cozy, rounded proportions shown in the inspiration photo. The large ears and little feet give it an extra-cute silhouette, while the soft velvet yarn makes it wonderfully squishy.
It is also a great stash-buster. Use elephant gray, warm taupe, cream, or beige for the body, then add dusty pink for the inner ears and a tiny pop of color for the optional bow.
This is exactly the kind of plush that looks adorable in Pinterest photos, short TikTok crafting videos, nursery decor, baby gifts, and handmade craft-fair displays. If you sell amigurumi at craft fairs, a small crocheted elephant is an excellent impulse-buy item because it is cute, giftable, and easy to display.
Pattern Overview
-
Pattern: Crocheted Elephant
-
Style: Plush amigurumi
-
Construction: No traditional sewing
-
Skill level: Easy / Beginner-friendly
-
Finished size: Approximately 9-10 inches tall
-
Yarn: Super bulky velvet or chenille
-
Hook: 5.0 mm crochet hook
-
Eyes: 10 mm or 12 mm safety eyes
-
Main color: Oatmeal, taupe, beige, or elephant gray
-
Accent color: Dusty pink
-
Construction: Head and body are crocheted continuously; ears, trunk, arms, feet, and tail are attached with crochet stitches or slip stitches.
Skill Level & Prerequisites
This is an Easy/Beginner-friendly crochet pattern.
You should be comfortable with:
-
Making a Magic Ring.
-
Working single crochet.
-
Increasing with inc.
-
Decreasing with dec.
-
Working in continuous rounds.
-
Counting stitches.
-
Basic color changes.
-
Basic shaping techniques.
-
Working into existing stitches to create attached crochet pieces.
The pattern is written using standard US crochet terminology.
Because plush yarn can hide individual stitches, beginners may find it helpful to use a stitch marker at the beginning of every round.
Materials & Tools Needed
-
Super Bulky Velvet or Chenille Yarn in oatmeal, beige, taupe, or elephant gray.
-
Small amount of dusty pink yarn for the inner ears.
-
Small amount of white yarn for optional toe details.
-
5.0 mm crochet hook. Use 4.5 mm if your stitches are naturally loose.
-
10 mm or 12 mm black safety eyes.
-
Polyester fiberfill stuffing.
-
Tapestry needle for weaving in yarn ends only.
-
Stitch marker.
-
Scissors.
-
Optional: fabric-safe blush for soft pink cheeks.
Tip: Choose a hook that produces a tight fabric. You should not be able to see large holes between the stitches after stuffing.
Abbreviations Used
| Abbreviation | Meaning |
|---|---|
| MR | Magic Ring |
| sc | Single Crochet |
| inc | Increase - 2 sc in the same stitch |
| dec | Decrease - single crochet 2 stitches together |
| ch | Chain |
| sl st | Slip Stitch |
| st/sts | Stitch/Stitches |
| FO | Fasten Off |
All crochet terminology in this pattern follows standard US crochet terms.
Important Pattern Notes
Work the head and body in continuous rounds unless otherwise stated.
Do not join each round with a sl st unless the instructions specifically tell you to.
Use a stitch marker to identify the first stitch of each round.
Stuff firmly but gradually. Plush yarn stretches as you add stuffing, so small amounts of fiberfill at a time will create a smoother shape.
The eyes are inserted before the head is completely closed.
For a truly no-sew finish, the ears, arms, feet, and tail are attached using crochet stitches or slip stitches rather than being sewn on with a needle.
Head & Body - Crocheted Continuously
The head begins at the top and gradually expands. After the head is shaped, the pattern flows directly into the round body.
Head
Round 1: 6 sc in MR. (6 sts)
Round 2: inc in each st around. (12 sts)
Round 3: [sc in next st, inc in next st] around. (18 sts)
Round 4: [sc in next 2 sts, inc in next st] around. (24 sts)
Round 5: [sc in next 3 sts, inc in next st] around. (30 sts)
Round 6: [sc in next 4 sts, inc in next st] around. (36 sts)
Round 7: sc in each st around. (36 sts)
Round 8: sc in each st around. (36 sts)
Round 9: sc in each st around. (36 sts)
Round 10: sc in each st around. (36 sts)
Insert the Safety Eyes
Place the safety eyes between Rounds 9 and 10, approximately 8-9 stitches apart.
Check the placement before locking the backs into position.
The eyes should sit slightly wider than the center of the face, giving the elephant the sweet, wide-eyed expression shown in the inspiration photo.
Round 11: sc in each st around. (36 sts)
Round 12: sc in each st around. (36 sts)
Round 13: sc in each st around. (36 sts)
Round 14: [sc in next 4 sts, dec] around. (30 sts)
Round 15: [sc in next 3 sts, dec] around. (24 sts)
Round 16: [sc in next 2 sts, dec] around. (18 sts)
Lightly stuff the head before continuing.
Body
The body begins immediately after the head, so there is no head-to-body seam.
Round 17: [sc in next 2 sts, inc] around. (24 sts)
Round 18: [sc in next 3 sts, inc] around. (30 sts)
Round 19: [sc in next 4 sts, inc] around. (36 sts)
Round 20: [sc in next 5 sts, inc] around. (42 sts)
Round 21: [sc in next 6 sts, inc] around. (48 sts)
Round 22: sc in each st around. (48 sts)
Round 23: sc in each st around. (48 sts)
Round 24: sc in each st around. (48 sts)
Round 25: sc in each st around. (48 sts)
Round 26: sc in each st around. (48 sts)
Round 27: sc in each st around. (48 sts)
Begin adding stuffing. Keep the belly round and full without stretching the stitches.
Round 28: [sc in next 6 sts, dec] around. (42 sts)
Round 29: [sc in next 5 sts, dec] around. (36 sts)
Round 30: [sc in next 4 sts, dec] around. (30 sts)
Round 31: [sc in next 3 sts, dec] around. (24 sts)
Round 32: [sc in next 2 sts, dec] around. (18 sts)
Round 33: [sc in next st, dec] around. (12 sts)
Round 34: dec around. (6 sts)
Add the final small amount of stuffing.
Fasten off and close the remaining opening with a few tight slip stitches. Weave in the yarn end.
Crocheted Trunk
The trunk is worked directly onto the front of the head, so you do not need to sew a separate trunk onto the elephant.
Turn the elephant so the face is toward you.
Identify approximately 8 stitches centered below the eyes.
Join the main-color yarn to the first stitch.
Trunk Round 1: Pick up 8 sc evenly across the selected face stitches. (8 sts)
Trunk Round 2: sc in each st around. (8 sts)
Trunk Round 3: sc in each st around. (8 sts)
Trunk Round 4: [sc in next 3 sts, inc] twice. (10 sts)
Trunk Round 5: sc in each st around. (10 sts)
Trunk Round 6: sc in each st around. (10 sts)
Trunk Round 7: sc in each st around. (10 sts)
Trunk Round 8: sc in each st around. (10 sts)
Trunk Round 9: [sc in next 3 sts, dec] twice. (8 sts)
Trunk Round 10: sc in each st around. (8 sts)
Trunk Round 11: [sc in next 2 sts, dec] twice. (6 sts)
Trunk Round 12: sc in each st around. (6 sts)
Trunk Round 13: dec around. (3 sts)
Add a tiny amount of stuffing to the trunk.
Fasten off. Leave a short yarn tail and pull it through the remaining stitches to close the trunk.
Use the crochet hook to tuck the end securely inside the trunk.
Left Ear
The large floppy ears are worked directly onto the sides of the head.
Position the elephant so the face is toward you.
Choose approximately 12 stitches along the left side of the head, centered between the upper head and cheek area.
Join the main-color yarn.
Left Ear Round 1: Pick up 12 sc around the selected stitches. (12 sts)
Left Ear Round 2: [sc in next st, inc] around. (18 sts)
Left Ear Round 3: [sc in next 2 sts, inc] around. (24 sts)
Left Ear Round 4: [sc in next 3 sts, inc] around. (30 sts)
Left Ear Round 5: sc in each st around. (30 sts)
Left Ear Round 6: [sc in next 3 sts, dec] around. (24 sts)
Left Ear Round 7: [sc in next 2 sts, dec] around. (18 sts)
Left Ear Round 8: [sc in next st, dec] around. (12 sts)
Left Ear Round 9: dec around. (6 sts)
Fasten off.
Use the hook to pull the final yarn end through the last stitches. Do not sew the ear to the head.
Right Ear
Join the main-color yarn to approximately 12 stitches on the right side of the head, positioned at the same height as the left ear.
Right Ear Round 1: Pick up 12 sc around the selected stitches. (12 sts)
Right Ear Round 2: [sc in next st, inc] around. (18 sts)
Right Ear Round 3: [sc in next 2 sts, inc] around. (24 sts)
Right Ear Round 4: [sc in next 3 sts, inc] around. (30 sts)
Right Ear Round 5: sc in each st around. (30 sts)
Right Ear Round 6: [sc in next 3 sts, dec] around. (24 sts)
Right Ear Round 7: [sc in next 2 sts, dec] around. (18 sts)
Right Ear Round 8: [sc in next st, dec] around. (12 sts)
Right Ear Round 9: dec around. (6 sts)
Fasten off and hide the yarn end inside the ear.
Inner Ears
For the soft pink centers, use dusty pink yarn.
These small pieces can be crocheted and attached directly to the outer ears using slip stitches. No sewing needle is required.
Left Inner Ear
Round 1: ch 8. Sc in 2nd ch from hook and in next 5 ch, 3 sc in last ch, sc in next 5 ch on the opposite side of the chain, 2 sc in the remaining chain space. (16 sts)
Round 2: inc, sc in next 5 sts, inc in next 3 sts, sc in next 5 sts, inc in next 2 sts. (22 sts)
Fasten off.
Place the pink piece in the center of the left ear. Attach it with evenly spaced sl sts around the outside edge.
Right Inner Ear
Round 1: ch 8. Sc in 2nd ch from hook and in next 5 ch, 3 sc in last ch, sc in next 5 ch on the opposite side of the chain, 2 sc in the remaining chain space. (16 sts)
Round 2: inc, sc in next 5 sts, inc in next 3 sts, sc in next 5 sts, inc in next 2 sts. (22 sts)
Fasten off.
Place the pink piece in the center of the right ear and attach it with evenly spaced sl sts.
This creates the layered ear appearance from the inspiration photo without traditional sewing.
Left Arm
The arms are short, rounded, and slightly floppy.
Attach the main-color yarn to approximately 6 stitches along the left side of the body between Rounds 20 and 24.
Left Arm Round 1: Pick up 6 sc around the selected body stitches. (6 sts)
Left Arm Round 2: inc in each st around. (12 sts)
Left Arm Round 3: sc in each st around. (12 sts)
Left Arm Round 4: sc in each st around. (12 sts)
Left Arm Round 5: sc in each st around. (12 sts)
Left Arm Round 6: sc in each st around. (12 sts)
Left Arm Round 7: [sc in next st, dec] around. (8 sts)
Left Arm Round 8: sc in each st around. (8 sts)
Left Arm Round 9: dec around. (4 sts)
Stuff the arm lightly.
Fasten off and close the final opening with sl sts.
Right Arm
Attach the main-color yarn to approximately 6 stitches along the right side of the body between Rounds 20 and 24.
Right Arm Round 1: Pick up 6 sc around the selected body stitches. (6 sts)
Right Arm Round 2: inc in each st around. (12 sts)
Right Arm Round 3: sc in each st around. (12 sts)
Right Arm Round 4: sc in each st around. (12 sts)
Right Arm Round 5: sc in each st around. (12 sts)
Right Arm Round 6: sc in each st around. (12 sts)
Right Arm Round 7: [sc in next st, dec] around. (8 sts)
Right Arm Round 8: sc in each st around. (8 sts)
Right Arm Round 9: dec around. (4 sts)
Stuff lightly.
Fasten off and close with sl sts.
Left Foot
The oversized feet give the elephant its cute, seated appearance.
Attach the main-color yarn to approximately 6 stitches along the lower-left front portion of the body.
Left Foot Round 1: Pick up 6 sc around the selected body stitches. (6 sts)
Left Foot Round 2: inc in each st around. (12 sts)
Left Foot Round 3: [sc in next st, inc] around. (18 sts)
Left Foot Round 4: sc in each st around. (18 sts)
Left Foot Round 5: sc in each st around. (18 sts)
Left Foot Round 6: sc in each st around. (18 sts)
Left Foot Round 7: [sc in next st, dec] around. (12 sts)
Left Foot Round 8: dec around. (6 sts)
Stuff firmly enough to create a round foot.
Fasten off and close the opening with sl sts.
Right Foot
Attach the main-color yarn to approximately 6 stitches along the lower-right front portion of the body.
Right Foot Round 1: Pick up 6 sc around the selected body stitches. (6 sts)
Right Foot Round 2: inc in each st around. (12 sts)
Right Foot Round 3: [sc in next st, inc] around. (18 sts)
Right Foot Round 4: sc in each st around. (18 sts)
Right Foot Round 5: sc in each st around. (18 sts)
Right Foot Round 6: sc in each st around. (18 sts)
Right Foot Round 7: [sc in next st, dec] around. (12 sts)
Right Foot Round 8: dec around. (6 sts)
Stuff firmly.
Fasten off and close with sl sts.
Tiny White Toe Details
For the sweet white toe markings shown in the inspiration photo, use a small amount of white yarn.
Rather than sewing them on, make tiny surface stitches directly over the front of each foot.
Create three small vertical sl sts on each foot.
Keep the marks short and evenly spaced.
This gives the feet a simple, clean plush-toy finish.
Tail
The tail is intentionally small so the elephant remains rounded and cuddly.
Attach the main-color yarn to the center-back of the body.
Tail Round 1: Pick up 6 sc. (6 sts)
Tail Round 2: sc in each st around. (6 sts)
Tail Round 3: sc in each st around. (6 sts)
Tail Round 4: sc in each st around. (6 sts)
Tail Round 5: sc in each st around. (6 sts)
Tail Round 6: [sc in next 2 sts, dec] around. (4 sts)
Tail Round 7: sc in each st around. (4 sts)
Tail Round 8: dec twice. (2 sts)
Fasten off.
Do not stuff the tail heavily. A tiny amount of fiberfill is enough.
Optional No-Sew Bow
A little crochet bow adds the same playful finishing touch as the bow shown on the elephant in the photo.
Using dusty pink, lavender, or your favorite accent color:
Bow: ch 12, sl st into the first ch to form a loop. Ch 12, sl st into the same starting point to form the second loop.
Ch 5 around the center point and sl st back into the same point.
Fasten off.
Wrap the center yarn around the bow a few times and tie it securely.
You can attach the bow around the base of one ear with a short chain loop instead of sewing it on.
Facial Details
The safety eyes already create a sweet expression, so this elephant does not require embroidered facial details.
For an even softer look:
-
Add a tiny amount of fabric-safe pink blush to both cheeks.
-
Keep the blush subtle.
-
Place the cheeks slightly below and outside the eyes.
-
Avoid putting decorative materials where a baby could pull them loose.
For young children, embroidered eyes are a safer alternative to plastic safety eyes. If using safety eyes, always follow the manufacturer's age and safety recommendations.
Finishing Touches: Quick Tips
-
Stuff gradually. Add fiberfill a little at a time to prevent lumps.
-
Shape as you stuff. Use your fingers to round the head, cheeks, and belly.
-
Keep the stitches tight. A smaller hook helps prevent stuffing from showing through.
-
Check eye placement first. Do not lock safety eyes until you are happy with the expression.
-
Make the ears floppy. Avoid overstuffing them.
-
Keep the trunk lightly stuffed. This allows it to curve naturally.
-
Balance the feet. Place them at equal heights so the elephant sits upright.
-
Use a stitch marker. Chenille stitches can be difficult to see, especially in dark colors.
-
Weave in every yarn end securely. The tapestry needle is only needed for hiding ends, not for assembling the elephant.
-
Brush gently. If your chenille yarn has flattened during crocheting, lightly fluff the finished toy with your fingers.
-
Customize the colors. Gray, cream, taupe, dusty pink, lavender, and warm beige all work beautifully.
-
For craft fairs, make several colorways. A neutral elephant, pink elephant, and gray elephant make an attractive little collection.
Why This Crocheted Elephant Makes a Great Gift
This plush elephant works for many occasions.
It makes a sweet handmade baby-shower gift, nursery decoration, birthday present, or keepsake. The chubby body also makes it especially appealing for handmade markets and craft fairs.
Because the pattern uses basic amigurumi shaping and a small number of crochet techniques, it is approachable for beginners while still producing a polished finished toy.
The no-sew construction is the biggest time-saver. Instead of spending extra time sewing individual limbs onto the body, you can crochet and attach the pieces with your hook.
That makes this crocheted elephant a fun weekend project, a quick handmade gift, and a charming addition to a plush-toy collection.
Final Result
Your finished elephant should have:
-
A large rounded head.
-
Oversized floppy ears.
-
Soft pink inner ears.
-
Big glossy safety eyes.
-
A long, gently curved trunk.
-
A round, chubby belly.
-
Short rounded arms.
-
Large seated feet.
-
Tiny white toe details.
-
A small tail.
-
An optional crochet bow.
-
A soft, squishy chenille texture.
The result is a cuddly, beginner-friendly elephant with the same cozy handmade character as the inspiration photo.
Crocheted Giraffe
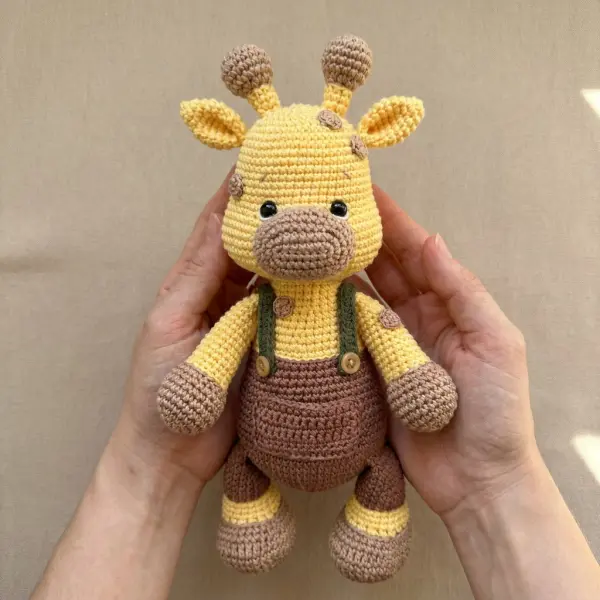
This adorable crocheted giraffe is a fun, beginner-friendly amigurumi project inspired by the sweet handmade giraffe in the photo. With a round head, tiny muzzle, floppy ears, tall ossicones, chunky legs, and cute little overalls, this plush has an irresistibly squishy personality.
The pattern is designed for quick crafting and simple construction. Most of the major pieces are worked directly onto the body with crochet stitches or slip stitches, keeping assembly to a minimum. There is no complicated garment sewing or difficult shaping.
Easy No-Sew Crochet Turtle Pattern Quick Plush Make
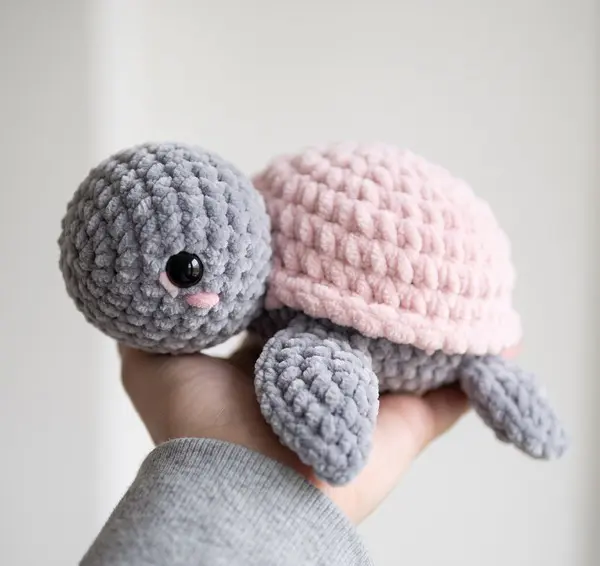
Create an irresistibly cute, chubby turtle inspired by the soft pastel plush in the photo. This Easy No-Sew Crochet Turtle Pattern uses chunky chenille yarn to create a soft, squishy texture and keeps the construction simple.
The head and body are crocheted as one continuous piece. The four flippers and tail are made first, flattened, and then crocheted directly into the body as you work. The pink shell is crocheted separately and attached with a crochet join rather than traditional needle sewing.
Free No-Sew Crochet Koala Pattern
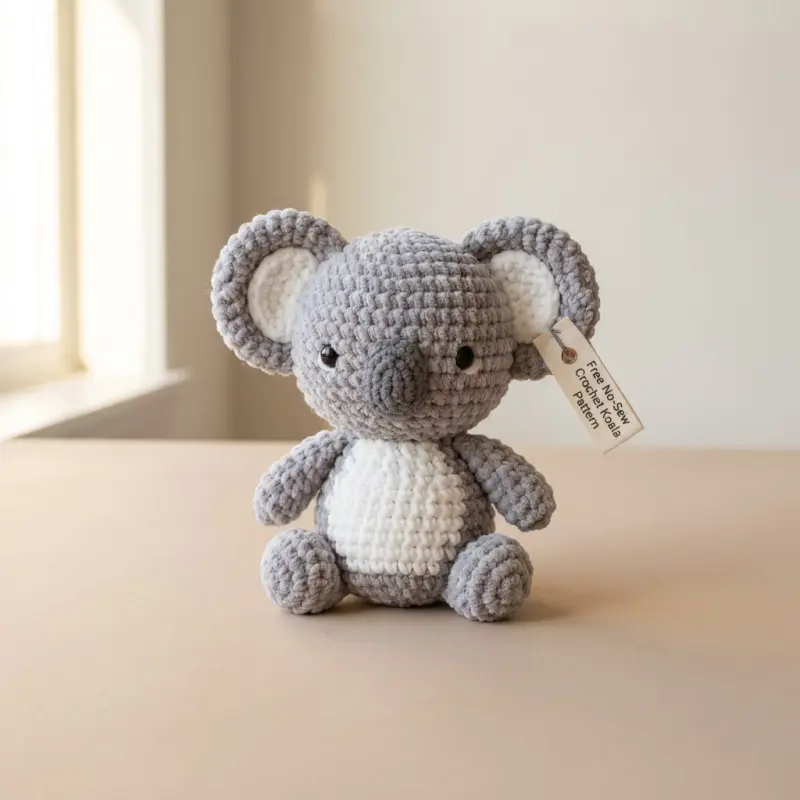
Create an irresistibly squishy Free No-Sew Crochet Koala Pattern with chunky chenille yarn, a round cuddly body, oversized ears, a soft white belly, tiny arms, and adorable little feet. This advanced-beginner amigurumi is designed so the major pieces are crocheted together as you work, eliminating traditional needle-sewn assembly.
The finished koala has the same plush, rounded character as the inspiration photo and works beautifully as a handmade gift, nursery decoration, key-sized plush variation, or craft-fair item.
Amigurumi Puppy
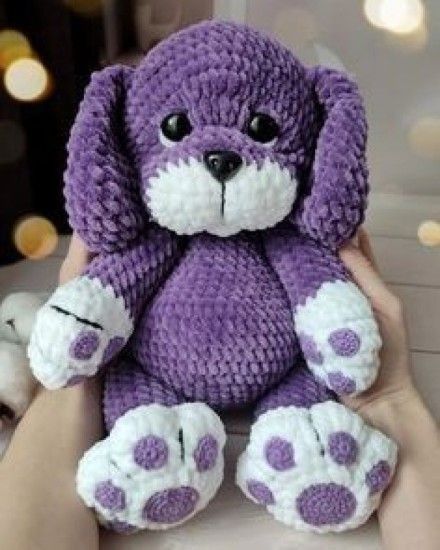
Create an irresistibly cuddly Amigurumi Puppy Crochet Pattern inspired by the adorable plush puppy shown in the photo. This chubby puppy features a deep violet body, oversized floppy ears, a soft white muzzle, and large white paws decorated with contrasting purple paw pads.
The pattern uses super bulky chenille yarn and is designed for advanced beginners who are comfortable crocheting amigurumi in continuous rounds, changing colors, increasing, decreasing, and sewing simple pieces together.
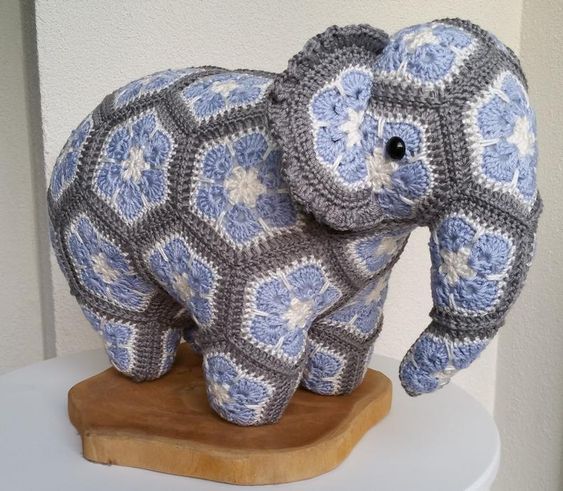
African flower crochet elephant free pattern
Materials and Tools
Yarn
Use a smooth, tightly spun sport or DK-weight cotton/cotton-blend yarn so the motifs remain crisp after joining and stuffing.
- Gray: approximately 100-120 g - outer framing, joining, and structural seams
- Light blue: approximately 70-90 g - flower petals
- Cream/white: approximately 40-60 g - flower centers and petal outlines
- Total: approximately 220-270 g
The exact amount will vary according to yarn brand, tension, and finished size.