
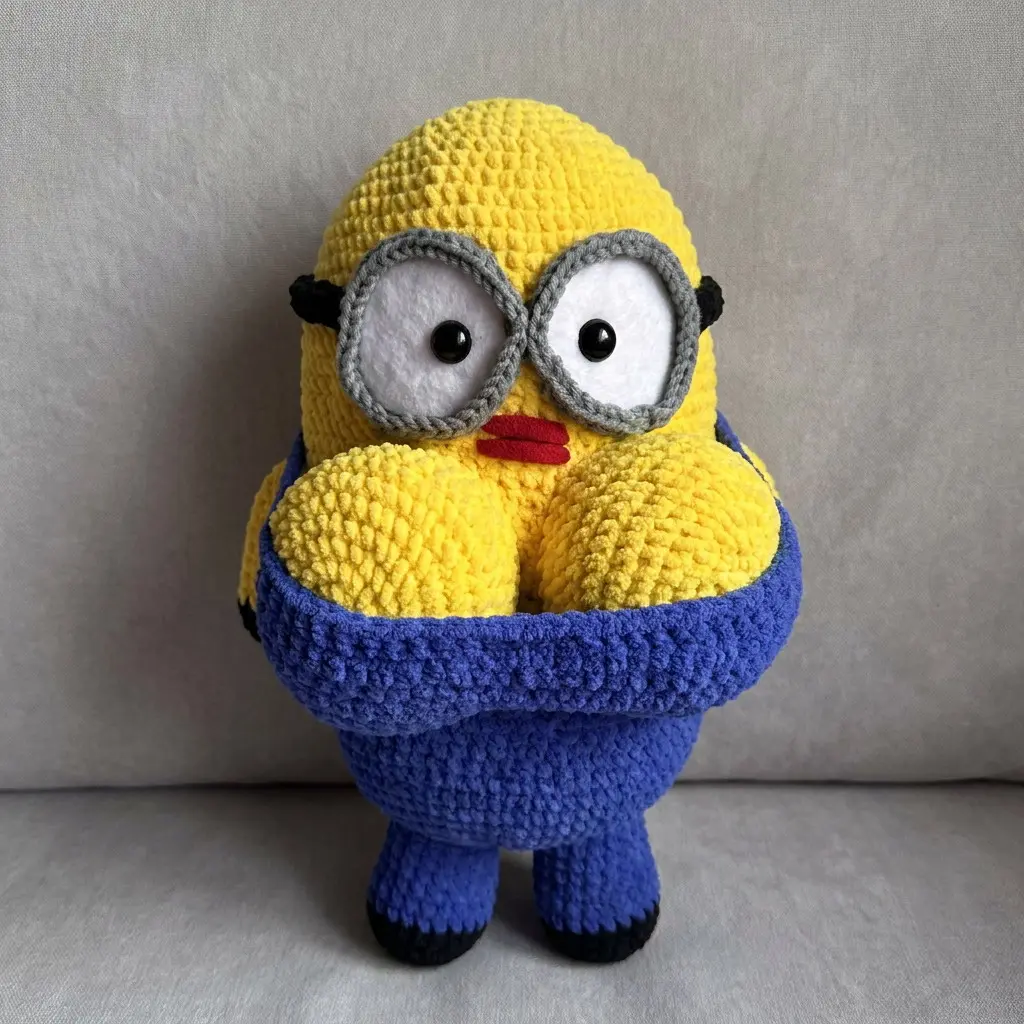
Easy No-Sew Crochet Minion Pattern - Chunky Plush Character-Inspired Amigurumi
Materials & Tools
- Chunky plush/chenille yarn
- Bright yellow - main body, head, arms, and hands
- Royal blue - overalls, pants, and legs
- Black - shoes, goggle strap, and small details
- Grey - goggle frames
- White - eyes
- Red - mouth
- 4.5-5.0 mm crochet hook, or the size needed to create tight stitches
- 12-14 mm safety eyes, 2
- Polyester fiberfill
- Stitch marker
- Tapestry needle for weaving in ends only, or use your crochet hook for a completely needle-free finish
- Fabric-safe craft glue for the goggles and optional felt eyes
- Small amount of white felt, if you prefer felt eye centers instead of crocheted eye pieces
Finished Size
Approximately 8-10 inches (20-25 cm) tall, depending on yarn thickness, hook size, and stuffing.
The finished plush is designed with a rounded, sitting silhouette, short blue legs, oversized yellow arms resting toward the front, and a large goggle-covered head.
Abbreviations
| Abbreviation | Meaning |
|---|---|
| MR | Magic ring |
| ch | Chain |
| sc | Single crochet |
| inc | Increase - 2 sc in the same stitch |
| dec | Invisible decrease |
| sl st | Slip stitch |
| BLO | Back loop only |
| FLO | Front loop only |
| st/sts | Stitch/stitches |
| FO | Fasten off |
| dc | Double crochet |
| Bobble | 7-dc bobble worked in one stitch |
Pattern is written in standard US crochet terminology.
Part 1: Separate Elements
Crochet Goggle Frames
Make Goggle Frame 1 in grey.
Goggle Frame 1
Round 1: MR, 6 sc into ring. (6)
Round 2: Inc in each st around. (12)
Round 3: (Sc in next st, inc in next st) around. (18)
Round 4: (Sc in next 2 sts, inc in next st) around. (24)
Round 5: (Sc in next 3 sts, inc in next st) around. (30)
Round 6: Sc in each st around. (30)
Sl st to the first st and FO, leaving a short tail for weaving.
Goggle Frame 2
Round 1: MR, 6 sc into ring. (6)
Round 2: Inc in each st around. (12)
Round 3: (Sc in next st, inc in next st) around. (18)
Round 4: (Sc in next 2 sts, inc in next st) around. (24)
Round 5: (Sc in next 3 sts, inc in next st) around. (30)
Round 6: Sc in each st around. (30)
Sl st to the first st and FO.
The two grey circles create the thick, oversized goggle rims seen in the reference design.
White Eye Centers
You can use white felt circles, or crochet the eye centers for a fully crocheted version.
Crocheted Eye Center 1
Using white yarn:
Round 1: MR, 6 sc into ring. (6)
Round 2: Inc in each st around. (12)
Round 3: (Sc in next st, inc in next st) around. (18)
Round 4: (Sc in next 2 sts, inc in next st) around. (24)
Sl st and FO.
Crocheted Eye Center 2
Using white yarn:
Round 1: MR, 6 sc into ring. (6)
Round 2: Inc in each st around. (12)
Round 3: (Sc in next st, inc in next st) around. (18)
Round 4: (Sc in next 2 sts, inc in next st) around. (24)
Sl st and FO.
Insert one 12-14 mm safety eye through the center of each white crocheted circle before mounting the circles onto the grey frames.
For a felt version, cut two matching white circles approximately the same diameter as the inside of the grey frames and insert the safety eyes through their centers.
Black Goggle Strap
Using black yarn:
Row 1: Ch 31.
Row 2: Sc in the 2nd ch from hook and across. (30)
Row 3: Ch 1, turn, sc across. (30)
FO.
The exact strap length can be adjusted according to your yarn thickness.
Position the strap horizontally across the back of the head.
For a strict no-sew finish, use fabric-safe glue to secure the strap behind the two goggle frames. The grey frames can also be secured with glue, or attached with surface slip stitches using grey yarn.
Part 2: Seamless Legs & Blue Overalls
The two legs begin separately, but they are joined entirely with crochet. Once joined, the pants and body are worked upward as one continuous piece.
Leg 1 - Black Shoe and Blue Leg
Start with black yarn.
Round 1: MR, 8 sc into ring. (8)
Round 2: Inc around. (16)
Round 3: Sc in each st around. (16)
Round 4: Sc in each st around. (16)
Change to royal blue.
Round 5: Sc in each st around. (16)
Round 6: Sc in each st around. (16)
Round 7: Sc in each st around. (16)
Round 8: Sc in each st around. (16)
Round 9: Sc in each st around. (16)
Round 10: Sc in each st around. (16)
Round 11: Sc in each st around. (16)
Round 12: Sc in each st around. (16)
Sl st to the first stitch and FO.
Set Leg 1 aside without stuffing it yet.
Leg 2 - Black Shoe and Blue Leg
Start with black yarn.
Round 1: MR, 8 sc into ring. (8)
Round 2: Inc around. (16)
Round 3: Sc in each st around. (16)
Round 4: Sc in each st around. (16)
Change to royal blue.
Round 5: Sc in each st around. (16)
Round 6: Sc in each st around. (16)
Round 7: Sc in each st around. (16)
Round 8: Sc in each st around. (16)
Round 9: Sc in each st around. (16)
Round 10: Sc in each st around. (16)
Round 11: Sc in each st around. (16)
Round 12: Sc in each st around. (16)
Do not fasten off.
Joining the Legs
Lightly stuff the black shoes and lower blue legs. Do not overstuff the upper portions.
The following round joins both legs without sewing.
Joining Round
From the working loop on Leg 2:
Sc in the next 8 sts of Leg 2, ch 4, sc in all 16 sts around the top of Leg 1, ch 4, sc in the remaining 8 sts of Leg 2. (40)
You now have one connected lower body.
The two chains form the small crotch bridge between the legs.
Blue Overall Body
Round 14: Sc in each st around, working 1 sc into each of the 4 chain stitches on each side. (40)
Round 15: (Sc in next 4 sts, inc in next st) around. (48)
Round 16: Sc in each st around. (48)
Round 17: (Sc in next 5 sts, inc in next st) around. (56)
Round 18: Sc in each st around. (56)
Round 19: Sc in each st around. (56)
Round 20: Sc in each st around. (56)
At this stage the royal-blue section forms the rounded lower overalls and pants.
Optional Overall Bib
For the strong blue bib visible beneath the yellow upper body, use royal blue yarn.
Chain 13.
Row 1: Sc in 2nd ch from hook and across. (12)
Row 2: Ch 1, turn, sc across. (12)
Row 3: Ch 1, turn, sc across. (12)
Row 4: Ch 1, turn, sc across. (12)
Row 5: Ch 1, turn, sc across. (12)
Row 6: Ch 1, turn, sc across. (12)
FO.
Instead of sewing the bib onto the body, position it on the front and use royal-blue yarn with your crochet hook to surface slip stitch around the four edges, anchoring the panel directly to the blue/yellow body.
This keeps the construction needle-free.
Overall Straps
Make the first strap using blue yarn.
Row 1: Ch 11.
Row 2: Sc in 2nd ch from hook and across. (10)
FO.
Make the second strap separately.
Row 1: Ch 11.
Row 2: Sc in 2nd ch from hook and across. (10)
FO.
Attach the straps to the top of the bib and upper blue section using surface slip stitches rather than sewing.
Part 3: Yellow Body & Face
Change to bright yellow at the top of the blue overalls.
Keep the body firmly stuffed as you work upward, adding small amounts of fiberfill every few rounds.
Yellow Body
Round 21: Change to yellow and sc in each st around. (56)
Round 22: (Sc in next 6 sts, inc in next st) around. (64)
Round 23: Sc in each st around. (64)
Integrated Front Arm/Cheek Puffs
The large yellow shapes resting across the front are created directly into the body with oversized bobble stitches.
7-dc Bobble
A 7-dc bobble is worked as follows:
- Yarn over and insert hook into the designated stitch.
- Pull up a loop.
- Yarn over and pull through 2 loops.
- Repeat the partial dc in the same stitch until 8 loops are on the hook.
- Yarn over and pull through all 8 loops.
- Gently tighten the top of the bobble.
Each bobble counts as 1 stitch.
The thick chenille yarn makes these bobbles expand into soft, rounded arm/cheek shapes.
Round 24
Work:
- Sc in sts 1-11.
- 7-dc bobble in st 12.
- 7-dc bobble in st 13.
- 7-dc bobble in st 14.
- Sc in sts 15-43.
- 7-dc bobble in st 44.
- 7-dc bobble in st 45.
- 7-dc bobble in st 46.
- Sc in sts 47-64.
Total: 64 sts
The first three bobbles form the left front arm/cheek and the second three bobbles form the right front arm/cheek.
Round 25
Work:
- Sc in sts 1-12.
- 7-dc bobble in st 13.
- 7-dc bobble in st 14.
- 7-dc bobble in st 15.
- Sc in sts 16-42.
- 7-dc bobble in st 43.
- 7-dc bobble in st 44.
- 7-dc bobble in st 45.
- Sc in sts 46-64.
Total: 64 sts
Round 26
Work:
- Sc in sts 1-11.
- 7-dc bobble in st 12.
- 7-dc bobble in st 13.
- 7-dc bobble in st 14.
- Sc in sts 15-43.
- 7-dc bobble in st 44.
- 7-dc bobble in st 45.
- 7-dc bobble in st 46.
- Sc in sts 47-64.
Total: 64 sts
Round 27-Sc in each st around. (64)
Round 28-Sc in each st around. (64)
These two plain rounds soften the top edge of the arm puffs and transition smoothly into the head.
Rounded Head
Round 29: Sc in each st around. (64)
Round 30: Sc in each st around. (64)
Round 31: (Sc in next 6 sts, dec in next st) around. (56)
Round 32: Sc in each st around. (56)
Round 33: (Sc in next 5 sts, dec in next st) around. (48)
Round 34: Sc in each st around. (48)
Round 35: (Sc in next 4 sts, dec in next st) around. (40)
Round 36: Sc in each st around. (40)
Round 37: (Sc in next 3 sts, dec in next st) around. (32)
Round 38: (Sc in next 2 sts, dec in next st) around. (24)
Round 39: (Sc in next st, dec in next st) around. (16)
Firmly stuff the head and body.
Round 40: Dec around. (8)
FO and close the remaining 8 stitches by pulling the working yarn through the front loops of the stitches. Tighten securely.
Use a crochet hook to bury the yarn tail inside the plush.
Face Details
Positioning the Goggles
Place the two grey goggle frames on the front of the yellow head.
For the characteristic oversized expression:
- The inner edges of the frames should almost touch.
- The goggles should sit slightly above the arm puffs.
- Keep both circles at approximately the same height.
- Angle the two frames very slightly toward one another for a playful expression.
Place the white eye centers inside the grey frames.
The black safety eyes should sit approximately in the center of the white areas.
Secure the white circles to the grey frames with small amounts of fabric-safe glue.
Then secure the completed goggles to the yellow head.
For a completely no-sew finish, use surface slip stitches around selected portions of the grey outer edges to anchor the goggles directly into the head. Glue may be used underneath for additional stability.
Black Goggle Strap
Position the black crocheted strap horizontally behind the goggles.
The strap should extend from the outside edge of the first goggle to the outside edge of the second goggle and slightly beyond both sides.
Secure it with fabric-safe glue or surface slip stitches.
Add small black yarn-covered side tabs at the outer edges if you want the chunky look shown in the reference.
Direct-Crochet Red Lips
The mouth is intentionally bold and simple.
Use red yarn and a crochet hook.
Upper Lip
Insert your hook into the yellow fabric at approximately the center front of Round 30.
Pull red yarn through to the outside.
Work 5 surface slip stitches horizontally across the face.
Fasten off.
Lower Lip
Insert the hook approximately one round below the upper lip.
Pull red yarn through.
Work 7 surface slip stitches horizontally, creating a slightly wider lower section.
Fasten off.
Pull both tails through to the inside of the head and hide them inside the stuffing.
The result is a chunky two-line red mouth without embroidery or needle sewing.
Assembly & Finishing
1. Shape the Body
Before finalizing the face:
- Make sure both feet sit flat.
- Push a little extra stuffing into the lower blue body.
- Firm up the yellow head.
- Keep the front arm/cheek puffs soft and rounded.
- Avoid overstuffing the bobbles, as the chenille naturally creates their volume.
2. Position the Legs
Stand the plush upright.
The two blue legs should remain parallel with a small gap between the feet.
The black shoe sections should face directly forward.
If one leg twists slightly, gently rotate the stitches before adding the final stuffing.
3. Shape the Overalls
Smooth the royal-blue lower body with your fingers.
Center the blue bib directly beneath the face.
The straps should run upward toward the sides of the yellow upper body.
Use surface slip stitches or fabric-safe glue instead of a sewing needle.
4. Shape the Front Arms
The three stacked bobble groups on each side naturally form the large rounded yellow arms.
Gently push the center of each group forward.
Do not pull the bobbles tightly; allowing the chenille loops to relax gives the plush, folded appearance of the reference.
5. Attach the Goggles
Center the grey frames over the face.
Make sure both safety eyes are facing forward.
Secure the frames and black strap with fabric-safe glue and/or surface slip stitches.
6. Finish the Face
Check that:
- The goggles are level.
- The safety eyes are firmly locked.
- The red lips sit centered beneath the goggles.
- No stuffing is visible around the eye pieces.
7. Hide Yarn Ends
For a completely no-sew finish, use the crochet hook to pull every remaining yarn tail several inches through the interior of the plush.
Trim the excess close to the fabric.
The tails will disappear into the chenille fibers.
No traditional needle sewing is required for the legs, shoes, overalls, body, head, arm/cheek details, mouth, or main facial construction.
Final No-Sew Construction Summary
- Shoes - legs: continuous crocheted tubes.
- Legs - pants: joined directly with chains and single crochet.
- Pants - body: continuous rounds.
- Blue - yellow body: seamless color change.
- Arms/cheeks: oversized bobble clusters crocheted directly into the yellow body.
- Mouth: surface slip stitches directly onto the face.
- Overalls/bib: crochet-attached with surface slip stitches.
- Goggles: crochet pieces secured without traditional sewing.
- Yarn tails: hidden inside the stuffed body with a hook.
This construction gives the plush its characteristic round sitting body, chunky blue overalls, short black-tipped feet, oversized yellow front arms, and large expressive goggles while keeping the main amigurumi structure essentially no-sew and beginner-friendly.
Crocheted Elephant
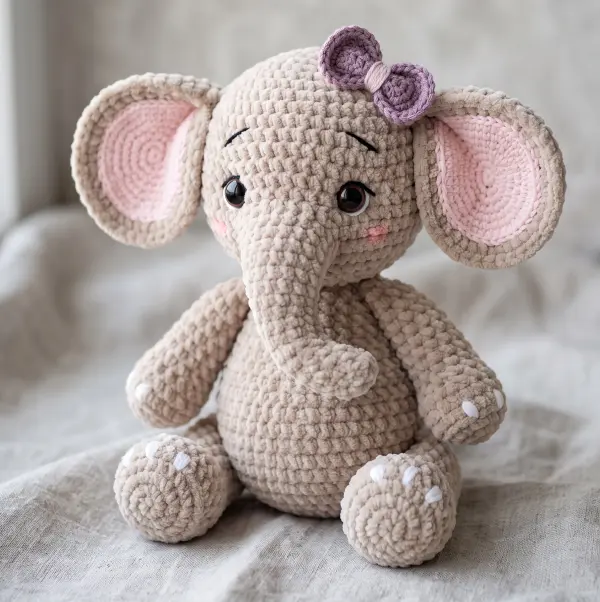
A soft, chubby, squishy crocheted elephant is one of those projects that is almost impossible to resist. With its oversized ears, tiny trunk, round belly, and cuddly chenille texture, this little elephant has the perfect handmade-toy look.
This beginner-friendly pattern is designed for quick crafting with plush yarn. The construction keeps the assembly simple, with parts attached using crochet stitches and slip stitches instead of traditional sewing. That makes it especially appealing if you love no-sew amigurumi and want a project you can finish in a short crafting session.
Easy No-Sew Crochet Spider Superhero Plush Pattern
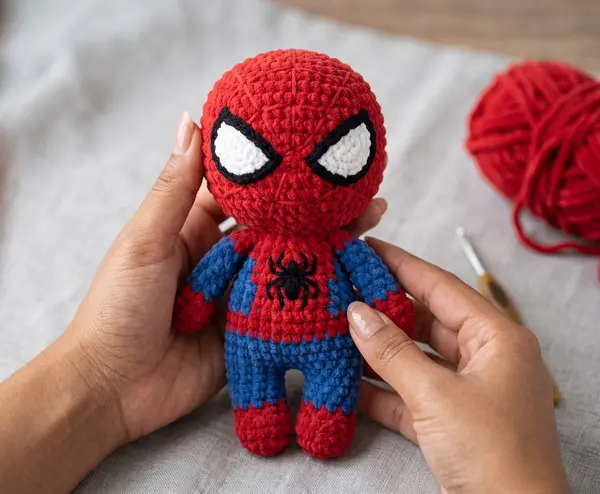
Easy No-Sew Crochet Spider Superhero Plush Pattern 🕷️❤️💙
Free No-Sew Crochet Koala Pattern
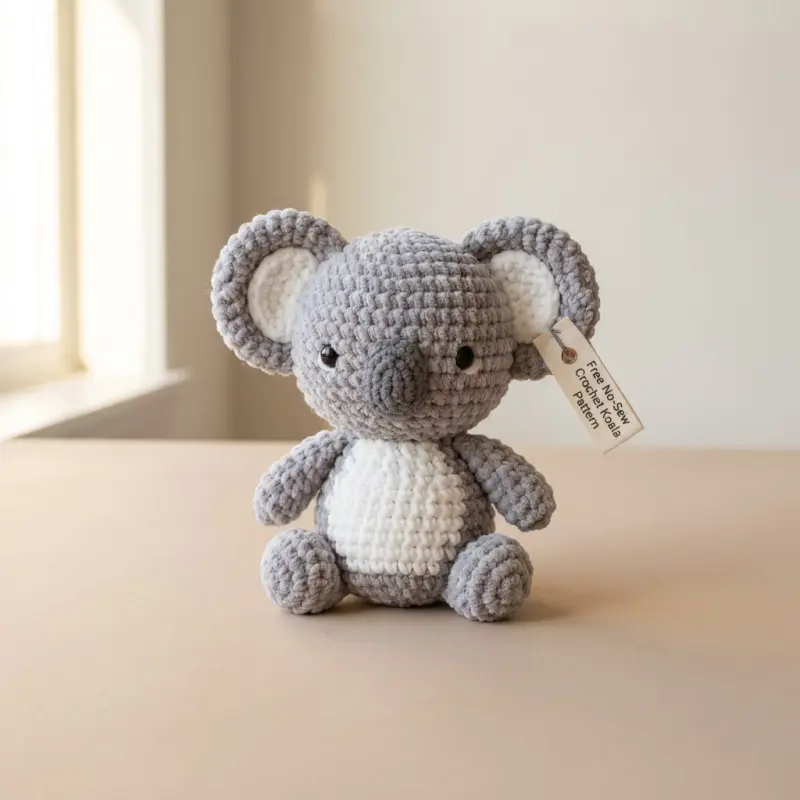
Create an irresistibly squishy Free No-Sew Crochet Koala Pattern with chunky chenille yarn, a round cuddly body, oversized ears, a soft white belly, tiny arms, and adorable little feet. This advanced-beginner amigurumi is designed so the major pieces are crocheted together as you work, eliminating traditional needle-sewn assembly.
The finished koala has the same plush, rounded character as the inspiration photo and works beautifully as a handmade gift, nursery decoration, key-sized plush variation, or craft-fair item.
Realistic Labrador Amigurumi Crochet Pattern
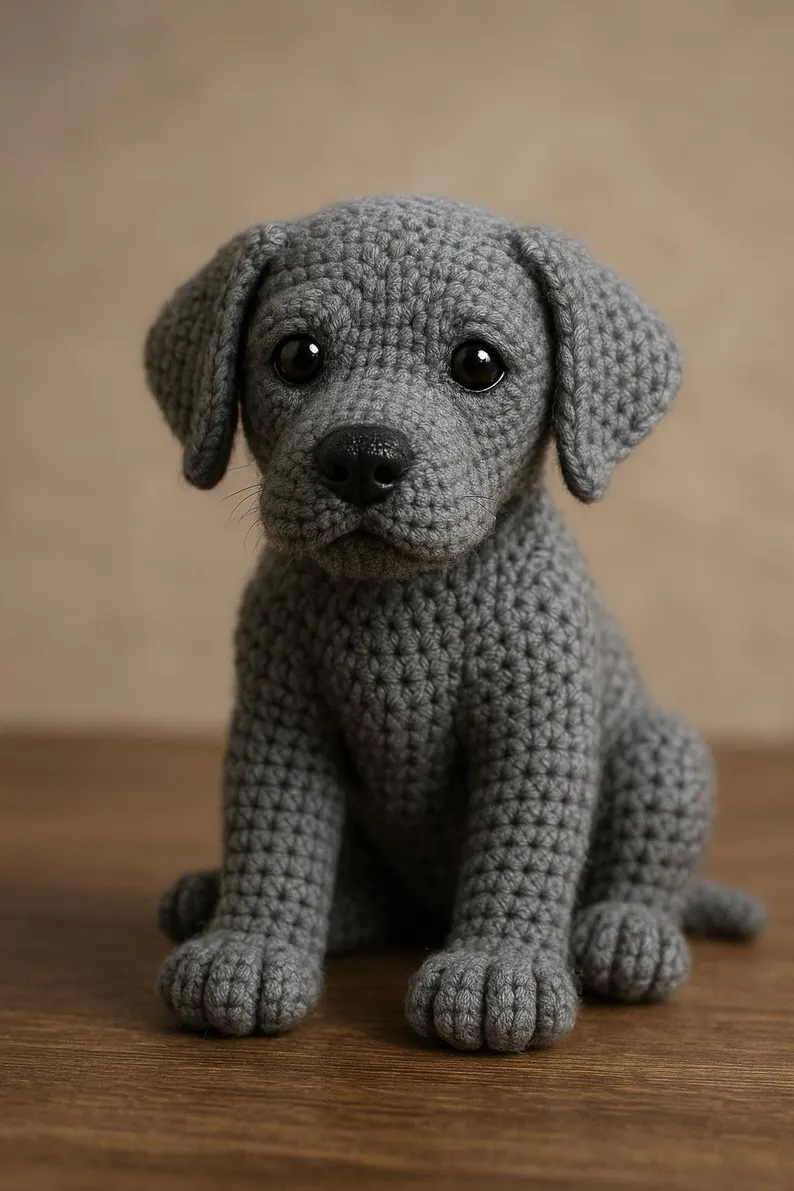
Realistic Labrador Amigurumi Crochet Pattern - Life-Like Sitting Puppy
Amigurumi Puppy
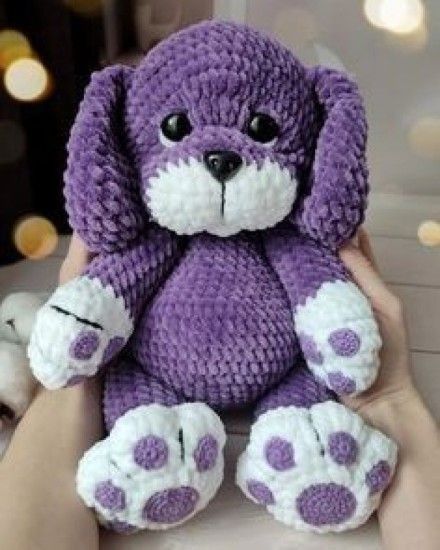
Create an irresistibly cuddly Amigurumi Puppy Crochet Pattern inspired by the adorable plush puppy shown in the photo. This chubby puppy features a deep violet body, oversized floppy ears, a soft white muzzle, and large white paws decorated with contrasting purple paw pads.
The pattern uses super bulky chenille yarn and is designed for advanced beginners who are comfortable crocheting amigurumi in continuous rounds, changing colors, increasing, decreasing, and sewing simple pieces together.