
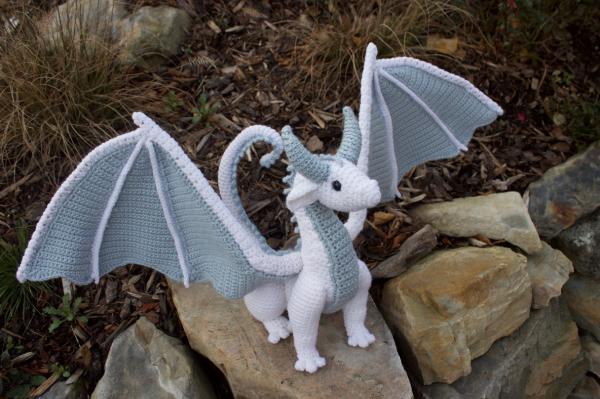
Free Dragon Crochet Pattern - Majestic Fantasy Dragon with Posable Ribbed Wings
Materials and Tools
Yarn
Use smooth DK/light worsted or medium-weight (#4) cotton or acrylic yarn with good stitch definition.
- Main color (MC): crisp white - approximately 250-300 g
- Wing/belly/horn color (CC): dusty blue or pale sage green - approximately 150-180 g
- Small amount of black embroidery thread, optional, for nostrils and mouth detailing
- Optional small amount of pink or pale gray yarn for inner mouth details
Tools
- 3.25-3.5 mm crochet hook for DK yarn, or 3.75-4 mm for medium-weight yarn
- 10-12 mm black safety eyes
- Tapestry needle
- Stitch markers
- Sharp scissors
- Polyester fiberfill
- Rust-resistant craft wire, approximately 1-1.5 mm thick, for the wing armature
- Optional 1 mm coated craft wire for gentle support inside the tail and legs
- Wire cutters and round-nose pliers
- Optional locking stitch markers
Finished Size
With DK yarn and the recommended hook, the finished dragon is approximately:
- Height: 30-34 cm / 12-13 1/2 in
- Body length including tail: 38-45 cm / 15-18 in
- Wingspan: 55-65 cm / 22-26 in
Exact dimensions will vary according to yarn, hook size, stuffing tension, and wing wire.
Abbreviations
Standard US crochet terminology is used throughout.
| Abbreviation | Meaning |
|---|---|
| MR | Magic ring |
| ch | Chain |
| sc | Single crochet |
| hdc | Half double crochet |
| dc | Double crochet |
| tr | Treble crochet |
| sl st | Slip stitch |
| inc | 2 sc in the same stitch |
| dec | Single crochet 2 together |
| BLO | Back loop only |
| FLO | Front loop only |
| st/sts | Stitch/stitches |
| FO | Fasten off |
| rep | Repeat |
| Rnd | Round |
| RS | Right side |
| WS | Wrong side |
Pattern note: Unless specifically stated otherwise, work amigurumi pieces in continuous rounds. Use a stitch marker to identify the beginning of each round.
Part 1: Head, Horns and Spikes
The head is deliberately elongated to reproduce the elegant, narrow dragon profile in the photograph. The snout is crocheted first, followed by the cheeks and back of the skull.
A. Sculpted Snout and Head
Work in MC white.
Snout
Rnd 1: 6 sc in MR. (6)
Rnd 2: inc around. (12)
Rnd 3: (sc, inc) around. (18)
Rnd 4: (2 sc, inc) around. (24)
Rnd 5: sc around. (24)
Rnd 6: (3 sc, inc) around. (30)
Rnd 7: sc around. (30)
Rnd 8: (4 sc, inc) around. (36)
Rnd 9: sc around. (36)
Rnd 10: (5 sc, inc) around. (42)
Rnd 11-13: sc around. (42)
Lightly stuff the front of the muzzle.
Eyes and Skull
Rnd 14: (6 sc, inc) around. (48)
Rnd 15-18: sc around. (48)
Place the safety eyes between Rnd 15 and Rnd 16, approximately 9 stitches apart.
The eyes should sit slightly above the centerline of the muzzle rather than directly beside the nose.
Rnd 19: (6 sc, dec) around. (42)
Rnd 20: sc around. (42)
Rnd 21: (5 sc, dec) around. (36)
Rnd 22: (4 sc, dec) around. (30)
Rnd 23: sc around. (30)
Rnd 24: (3 sc, dec) around. (24)
Rnd 25: (2 sc, dec) around. (18)
Begin firmly stuffing the skull.
Rnd 26: (sc, dec) around. (12)
Rnd 27: dec around. (6)
FO and close the opening.
Nose Definition
Using black embroidery thread, add two tiny nostrils approximately 4-5 stitches apart near the front of the snout.
For a softer realistic appearance, make the nostrils small horizontal stitches rather than large black dots.
B. Lower Jaw
Work in MC.
Row 1: Ch 8. Starting in 2nd ch from hook, sc across. (7)
Row 2: ch 1, turn, inc, 5 sc, inc. (9)
Row 3: ch 1, turn, sc across. (9)
Row 4: ch 1, turn, inc, 7 sc, inc. (11)
Row 5-6: ch 1, turn, sc across. (11)
FO, leaving a long sewing tail.
Fold the jaw slightly lengthwise and attach it beneath the snout. Do not overstuff it; the lower jaw should remain narrower than the upper head.
Embroider a short dark line from the corners of the mouth toward the cheeks.
C. Blue Horns
Make 2 horns in CC.
These horns are intentionally slightly curved.
Rnd 1: 5 sc in MR. (5)
Rnd 2: sc around. (5)
Rnd 3: (sc, inc) x 2, sc. (7)
Rnd 4-5: sc around. (7)
Rnd 6: (2 sc, inc) x 2, sc. (9)
Rnd 7-9: sc around. (9)
Rnd 10: (3 sc, inc) x 2, sc. (11)
Rnd 11-13: sc around. (11)
Rnd 14: (3 sc, dec) x 2, sc. (9)
Rnd 15: (2 sc, dec) x 2, sc. (7)
Rnd 16: (sc, dec) x 2, sc. (5)
FO.
Stuff only the lower half very lightly. Curve the tip backward while sewing each horn to the rear upper portion of the head.
Horn Texture
Using a tapestry needle and matching CC yarn, make short raised diagonal stitches around each horn. Space them every 2-3 rounds.
This creates the segmented appearance of a real horn without making the horns excessively bulky.
D. Head Spikes
Make 5 small spikes in CC.
For each spike:
Rnd 1: 4 sc in MR. (4)
Rnd 2: (sc, inc) twice. (6)
Rnd 3: sc around. (6)
Rnd 4: (2 sc, inc) twice. (8)
Rnd 5: sc around. (8)
Rnd 6: dec around. (4)
FO.
Do not stuff heavily.
Sew the spikes in a graduated line from the back of the head toward the beginning of the neck. Angle each spike slightly backward.
Part 2: Underbelly and Main Body
The body is designed as a sturdy, upright oval with a raised chest and long graceful neck.
A. Main Body
Work in MC.
Rnd 1: 6 sc in MR. (6)
Rnd 2: inc around. (12)
Rnd 3: (sc, inc) around. (18)
Rnd 4: (2 sc, inc) around. (24)
Rnd 5: (3 sc, inc) around. (30)
Rnd 6: (4 sc, inc) around. (36)
Rnd 7: (5 sc, inc) around. (42)
Rnd 8: (6 sc, inc) around. (48)
Rnd 9-14: sc around. (48)
The body should now resemble a broad oval.
Rnd 15: (6 sc, dec) around. (42)
Rnd 16: sc around. (42)
Rnd 17: (5 sc, dec) around. (36)
Rnd 18-21: sc around. (36)
Rnd 22: (4 sc, dec) around. (30)
Rnd 23-25: sc around. (30)
Rnd 26: (3 sc, dec) around. (24)
Rnd 27: sc around. (24)
Stuff firmly, concentrating extra fiberfill around the lower belly and hips.
Rnd 28: (2 sc, dec) around. (18)
Rnd 29: (sc, dec) around. (12)
Rnd 30: dec around. (6)
FO and close.
B. Long Curved Neck
Work in MC.
Rnd 1: 6 sc in MR. (6)
Rnd 2: inc around. (12)
Rnd 3: (sc, inc) around. (18)
Rnd 4-7: sc around. (18)
Rnd 8: (2 sc, inc) around. (24)
Rnd 9-12: sc around. (24)
Rnd 13: (3 sc, inc) around. (30)
Rnd 14-18: sc around. (30)
Rnd 19: (4 sc, inc) around. (36)
Rnd 20-22: sc around. (36)
FO, leaving a long sewing tail.
Stuff the neck firmly enough to hold its shape, but keep the upper section slightly flexible.
Sew the narrow end of the neck to the front upper section of the body.
Creating the Dragon's Curved Neck
Do not attach the neck completely upright.
Position it so that:
- The lower neck leans slightly forward.
- The middle neck rises vertically.
- The upper neck bends gently forward.
- The head points slightly downward.
Pin the neck in position first. Sew around the entire base twice for strength.
C. Contrasting Underbelly Panel
The pale blue/green belly panel gives the dragon its characteristic scaled chest.
Work in CC.
Neck-to-Belly Panel
Row 1: Ch 8. Sc in 2nd ch from hook and across. (7)
Row 2: ch 1, turn, sc across. (7)
Row 3: ch 1, turn, inc, 5 sc, inc. (9)
Row 4: sc across. (9)
Row 5: inc, 7 sc, inc. (11)
Row 6-8: sc across. (11)
Row 9: inc, 9 sc, inc. (13)
Row 10-12: sc across. (13)
Row 13: inc, 11 sc, inc. (15)
Row 14-17: sc across. (15)
Row 18: inc, 13 sc, inc. (17)
Row 19-25: sc across. (17)
FO, leaving a long sewing tail.
Belly Scale Texture
Instead of leaving the panel completely flat, create raised horizontal scale lines.
Using CC yarn and a tapestry needle:
- Begin at the narrow neck end.
- Make shallow curved stitches from side to side.
- Place one line every 2-3 rows.
- Alternate the position of each curve.
- Keep the central scales smaller near the throat.
- Gradually make the scales larger toward the abdomen.
Sew the panel down the centerline of the neck and body.
Only sew the side edges every few stitches. This allows the panel to retain a subtle three-dimensional texture.
Part 3: Sturdy Legs and Long Tail
The four legs are intentionally thick at the upper section and narrower toward the feet, creating the powerful stance visible in the reference.
A. Front Legs
Make 2 in MC.
Upper Leg
Rnd 1: 6 sc in MR. (6)
Rnd 2: inc around. (12)
Rnd 3: (sc, inc) around. (18)
Rnd 4-8: sc around. (18)
Rnd 9: (sc, dec) around. (12)
Rnd 10-16: sc around. (12)
Stuff firmly.
Front Ankle
Rnd 17: (2 sc, dec) around. (9)
Rnd 18-21: sc around. (9)
Do not FO.
Front Foot
Rnd 22: (sc, inc) around. (13)
Rnd 23: sc around. (13)
Rnd 24: (sc, dec) around. (9)
Lightly stuff.
Rnd 25: dec around. (5)
FO and close.
B. Front Claws
Using MC or a slightly darker white/gray yarn, create 3 claws per foot.
For each claw:
- Insert the hook through the front of the foot.
- Pull up a loop.
- Ch 3.
- Sl st back down the chain.
- Fasten off inside the foot.
Position three claws across the front edge.
Gently curve the claws downward with your fingers.
C. Hind Legs
Make 2 in MC.
Hind legs should be larger and rounder than the front legs.
Rnd 1: 6 sc in MR. (6)
Rnd 2: inc around. (12)
Rnd 3: (sc, inc) around. (18)
Rnd 4: (2 sc, inc) around. (24)
Rnd 5-9: sc around. (24)
Rnd 10: (2 sc, dec) around. (18)
Rnd 11-15: sc around. (18)
Rnd 16: (sc, dec) around. (12)
Rnd 17-20: sc around. (12)
Stuff firmly.
Rnd 21: (2 sc, dec) around. (9)
Rnd 22: sc around. (9)
Rnd 23: (sc, inc) around. (13)
Rnd 24: sc around. (13)
Rnd 25: (sc, dec) around. (9)
Rnd 26: dec around. (5)
FO and close.
Add three claws to each hind foot using the same technique as the front feet.
Optional Leg Armature
For semi-posable legs, insert a short length of coated craft wire into each leg before closing.
Keep the wire completely enclosed inside the crochet and bend the end into a small loop so it cannot work through the fabric.
D. Long Curved Tail
The tail begins thick at the rear of the body and gradually becomes a narrow, elegant point.
Work in MC.
Rnd 1: 6 sc in MR. (6)
Rnd 2: inc around. (12)
Rnd 3: (sc, inc) around. (18)
Rnd 4-6: sc around. (18)
Rnd 7: (2 sc, inc) around. (24)
Rnd 8-11: sc around. (24)
Rnd 12: (3 sc, inc) around. (30)
Rnd 13-15: sc around. (30)
Rnd 16: (3 sc, dec) around. (24)
Rnd 17-22: sc around. (24)
Rnd 23: (2 sc, dec) around. (18)
Rnd 24-29: sc around. (18)
Rnd 30: (sc, dec) around. (12)
Rnd 31-38: sc around. (12)
Rnd 39: (2 sc, dec) around. (9)
Rnd 40-48: sc around. (9)
Rnd 49: (sc, dec) around. (6)
Rnd 50-58: sc around. (6)
Rnd 59: dec around. (3)
FO and close.
Tail Shaping
Stuff the first two-thirds firmly.
Gradually reduce the stuffing toward the tip.
Before the final closure, bend the tail into a graceful S-shaped upward curve.
For a permanently supported tail, insert a coated wire armature before closing. The wire should terminate several centimeters before the tip.
Part 4: Large Ribbed Dragon Wings
Make 2 mirrored wings in CC.
The wings consist of:
- A broad blue membrane.
- A white outer border.
- White structural wing bones.
- Optional internal wire for posing.
The wings are intentionally oversized compared with the body to reproduce the dramatic fantasy-dragon silhouette.
A. Wing Membrane
Left Wing
Work from the wing root outward.
Row 1: Ch 5. Sc in 2nd ch from hook and across. (4)
Row 2: ch 1, turn, inc, 2 sc, inc. (6)
Row 3: ch 1, turn, inc, 4 sc, inc. (8)
Row 4: ch 1, turn, inc, 6 sc, inc. (10)
Row 5: ch 1, turn, inc, 8 sc, inc. (12)
Row 6: ch 1, turn, inc, 10 sc, inc. (14)
Row 7: ch 1, turn, inc, 12 sc, inc. (16)
Row 8: ch 1, turn, inc, 14 sc, inc. (18)
Row 9: ch 1, turn, inc, 16 sc, inc. (20)
Row 10: ch 1, turn, inc, 18 sc, inc. (22)
Row 11: ch 1, turn, inc, 20 sc, inc. (24)
Row 12: ch 1, turn, inc, 22 sc, inc. (26)
Row 13: ch 1, turn, inc, 24 sc, inc. (28)
Row 14: ch 1, turn, inc, 26 sc, inc. (30)
Row 15: ch 1, turn, inc, 28 sc, inc. (32)
Row 16: ch 1, turn, inc, 30 sc, inc. (34)
Row 17: ch 1, turn, inc, 32 sc, inc. (36)
Row 18: ch 1, turn, inc, 34 sc, inc. (38)
At this point the membrane should be broad and fan-shaped.
Curved Outer Wing Edge
Row 19: ch 1, turn, sc across. (38)
Row 20: ch 1, turn, inc, 36 sc. (39)
Row 21: ch 1, turn, sc across. (39)
Row 22: ch 1, turn, inc, 37 sc. (40)
Row 23: ch 1, turn, sc across. (40)
Row 24: ch 1, turn, inc, 38 sc. (41)
Row 25: ch 1, turn, sc across. (41)
Row 26: ch 1, turn, inc, 39 sc. (42)
Row 27: ch 1, turn, sc across. (42)
Row 28: ch 1, turn, inc, 40 sc. (43)
Row 29: ch 1, turn, sc across. (43)
Row 30: ch 1, turn, inc, 41 sc. (44)
FO.
The resulting piece forms a large triangular-fan membrane with a slightly curved outer edge.
B. Right Wing
Make a second wing exactly the same way, but reverse the shaping visually when positioning it.
The wings are mirror images rather than identical pieces sewn onto the same side.
C. Ribbed Wing Texture
The photograph shows strong longitudinal wing ribs.
Create these with surface slip stitches rather than crocheting bulky cords separately.
Using MC white:
- Begin at the wing root.
- Work a line of surface sl sts toward the outer edge.
- Create the first rib approximately 5 stitches from the leading edge.
- Create a second rib through the center of the wing.
- Create a third rib between the center and trailing edge.
- Finish each rib at a different point along the outer wing.
Keep the ribs gently curved.
Do not pull the yarn tightly. The membrane should remain flat between the ribs.
D. White Wing Border
Join MC white to the outer edge of the blue wing.
Work:
Border Round: sc evenly around the complete wing, placing 3 sc in each major outer corner to prevent curling.
Along the long edges, place approximately one sc into each row end.
At the wing root, work 6-8 sc closely together.
Sl st to finish.
FO and weave in the end.
For a more dimensional edge, work one additional round of reverse single crochet (crab stitch) around the outer edge.
E. Structural Wing Bones
The major white ribs should be more prominent than the smaller surface ribs.
There are two good options.
Option 1 - Crocheted Bone Ribs
Using MC:
- Ch a length corresponding to the desired rib.
- Sc back along the chain.
- Add a second row of sc if a thicker rib is desired.
- Taper the final 3-4 stitches.
- FO, leaving a long tail.
- Sew the rib directly onto the blue membrane.
Use:
- One long rib along the leading edge.
- One central rib.
- Two shorter ribs branching toward the trailing edge.
Option 2 - Wire-Reinforced Ribs
For highly poseable wings, use craft wire.
Cut wire slightly shorter than the intended finished rib.
Bend both ends inward into small rounded loops.
Wrap the wire completely with MC yarn using tight single crochet stitches or a crocheted tube.
Sew the covered wire onto the wing.
Never leave exposed wire ends inside the finished toy.
F. Wing Armature
For wings that hold the dramatic raised position shown in the photograph:
- Cut two lengths of approximately 1-1.5 mm craft wire.
- Make each piece long enough to travel from the wing attachment point through the leading edge and toward the outer wing tip.
- Round the ends with pliers.
- Cover the wire completely with yarn.
- Insert or sew the armature along the leading edge.
- Add separate shorter wire supports through the main ribs if desired.
- Secure the armature to the wing root with several strong stitches.
The wire should be fully enclosed and should never be able to touch the fabric directly.
Bend the finished wings slowly rather than making sharp creases.
Assembly and Shaping Instructions
1. Attach the Legs
Position the two hind legs approximately 1-2 rounds behind the widest point of the body.
Place the front legs farther forward beneath the chest.
For the upright stance:
- Hind legs should angle slightly outward.
- Front legs should point almost vertically downward.
- Feet should sit flat.
- All four feet should touch the same imaginary ground plane.
Sew each leg around the entire attachment area.
Add a second reinforcing pass through the body and leg stitches.
2. Attach the Tail
Position the thick end of the tail centrally at the back of the body.
Sew around the complete circumference.
Then add several reinforcing stitches through the upper tail section.
Shape the tail gradually upward so the curve begins at the body rather than forming an abrupt bend.
3. Attach the Neck
Center the neck over the front third of the body.
Sew the neck securely around its complete base.
The finished profile should resemble:
body - rising neck - gentle forward curve - narrow head
Avoid creating a straight vertical neck; the subtle curve is one of the most important features of the dragon's silhouette.
4. Attach the Head
Place the head at the top of the neck.
Angle the muzzle slightly downward.
Sew through several layers of the head and neck rather than attaching only to the surface stitches.
Make at least two complete passes around the attachment point.
5. Position the Belly Panel
Center the blue belly panel directly beneath the neck.
Continue the panel visually onto the upper chest and abdomen.
Sew the panel securely at the top and bottom, then add small anchoring stitches along both sides.
This creates a slightly raised scale plate instead of a completely flat appliqué.
6. Attach the Horns
Place the horns toward the back of the skull.
Angle them slightly backward and outward.
The horns should remain behind the eyes and above the beginning of the neck.
Sew each horn through its entire base.
7. Add the Head Spikes
Arrange the spikes in descending size:
- Largest behind the head.
- Medium spikes along the upper neck.
- Smallest spikes farther down the neck.
Angle them backward.
This creates a continuous dorsal silhouette.
8. Attach the Wings
The wings should sit high on the upper back, slightly behind the neck.
Position the inner root of each wing approximately between the shoulder area and the upper middle of the body.
Before sewing, pin both wings in place and check them from:
- Front
- Back
- Side
- Above
The wing roots should be symmetrical.
Sew through the blue wing root and deep into the body stitches.
For extra security, make several horizontal reinforcement stitches through the wing base.
Dramatic Wing Position
For the pose shown in the reference:
- Curve the leading edge upward.
- Angle the wing tips slightly outward.
- Keep the central ribs gently arched.
- Allow the trailing edge to hang lower than the leading edge.
- Bend the wire gradually into a natural bat-wing curve.
The wire should provide support, not force the fabric into sharp angles.
Final Sculpting and Finishing
Realistic Body Shaping
Before completing the final yarn tails, gently massage the fiberfill into position.
Create:
- A slightly rounded chest.
- Full shoulder muscles.
- Rounded hips.
- A narrow waist between chest and hips.
- A firm but flexible neck.
- A progressively thinner tail.
Avoid stuffing every section equally. Uneven stuffing is useful for realistic shaping.
Facial Details
For additional realism:
- Add tiny nostrils with black thread.
- Embroider a subtle mouth line.
- Add small white or pale gray highlights around the eyes if desired.
- Use a tapestry needle to sculpt the cheeks with a few controlled stitches.
Final Check
Before displaying the dragon:
- Check that both wings are symmetrical.
- Confirm all safety-eye backs are completely enclosed.
- Make sure no wire ends are exposed.
- Check that all four feet sit securely.
- Reinforce the wing roots.
- Reinforce the neck-to-body join.
- Confirm the tail remains balanced.
- Trim all loose yarn ends.
- Weave every remaining tail deeply through several stitches before trimming.
The finished dragon should have a majestic upright stance, elongated curved neck, sculpted snout, raised horns and dorsal spikes, powerful four-legged body, elegant curling tail, contrasting scaled belly, and enormous ribbed wings capable of holding a dramatic pose.
Crocheted Giraffe
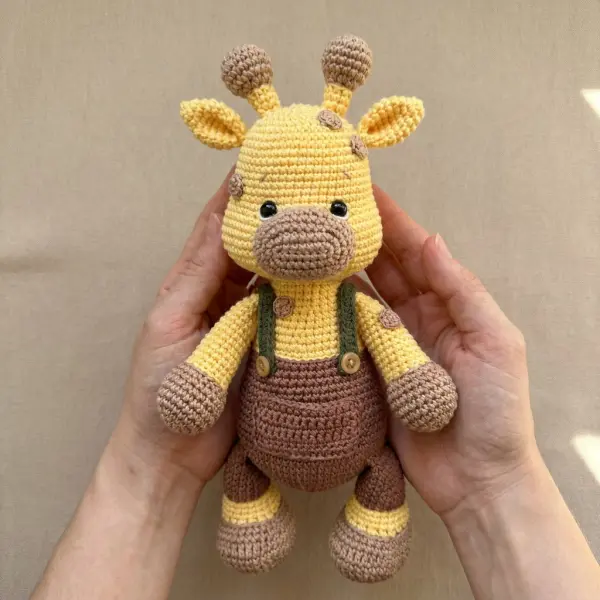
This adorable crocheted giraffe is a fun, beginner-friendly amigurumi project inspired by the sweet handmade giraffe in the photo. With a round head, tiny muzzle, floppy ears, tall ossicones, chunky legs, and cute little overalls, this plush has an irresistibly squishy personality.
The pattern is designed for quick crafting and simple construction. Most of the major pieces are worked directly onto the body with crochet stitches or slip stitches, keeping assembly to a minimum. There is no complicated garment sewing or difficult shaping.
Crocheted Elephant
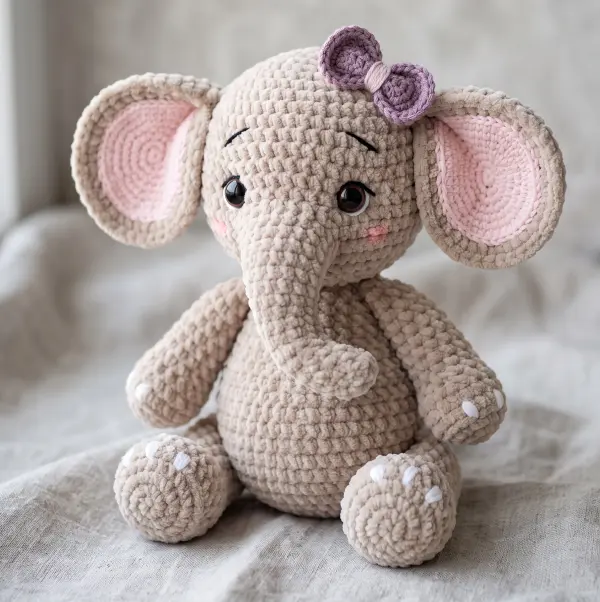
A soft, chubby, squishy crocheted elephant is one of those projects that is almost impossible to resist. With its oversized ears, tiny trunk, round belly, and cuddly chenille texture, this little elephant has the perfect handmade-toy look.
This beginner-friendly pattern is designed for quick crafting with plush yarn. The construction keeps the assembly simple, with parts attached using crochet stitches and slip stitches instead of traditional sewing. That makes it especially appealing if you love no-sew amigurumi and want a project you can finish in a short crafting session.
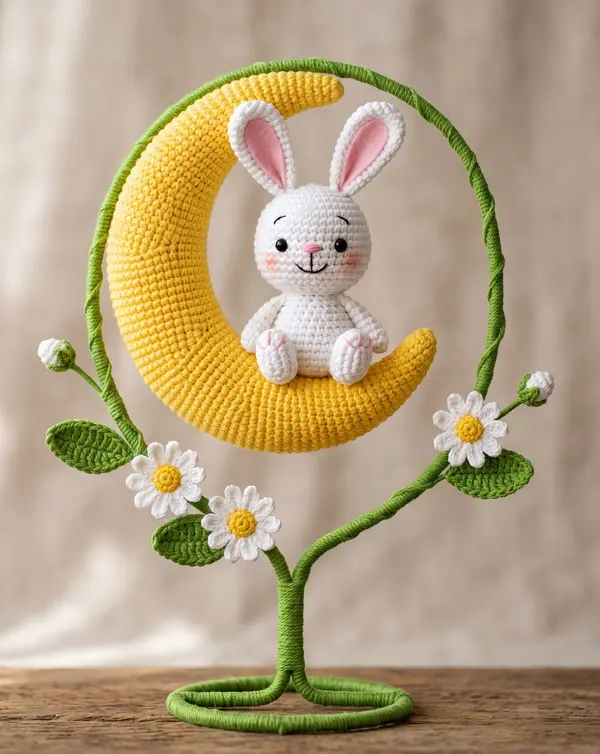
Amigurumi Snake Crochet Free Pattern
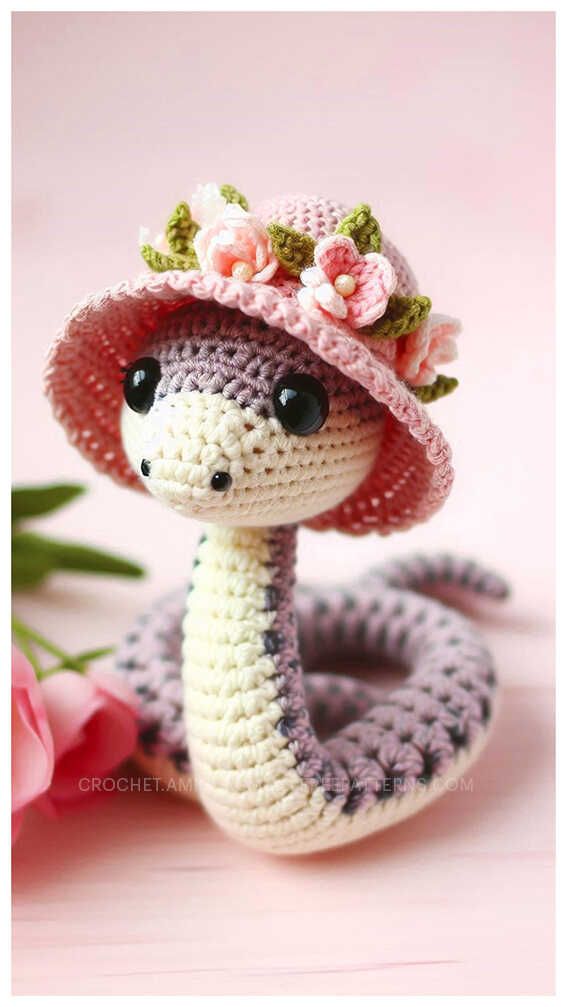
Create an irresistibly sweet coiled pastel snake amigurumi with a soft cream belly, oversized glossy eyes, tiny embroidered nostrils, and a charming pink sun hat covered in miniature flowers and leaves. This elegant snake is worked primarily in continuous rounds and designed for advanced beginners to intermediate crocheters familiar with amigurumi shaping and color changes.
African flower crochet elephant free pattern
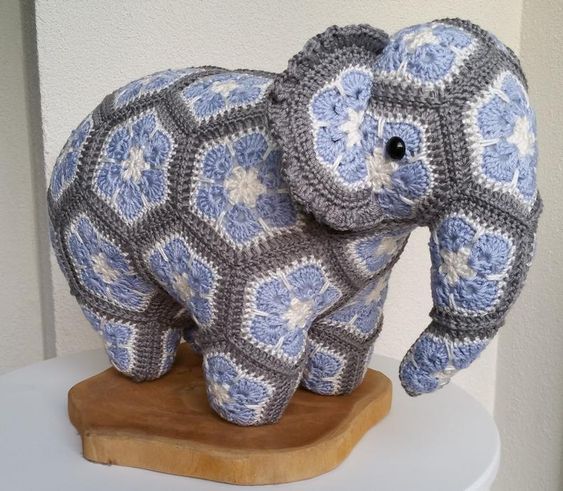
Materials and Tools
Yarn
Use a smooth, tightly spun sport or DK-weight cotton/cotton-blend yarn so the motifs remain crisp after joining and stuffing.
- Gray: approximately 100-120 g - outer framing, joining, and structural seams
- Light blue: approximately 70-90 g - flower petals
- Cream/white: approximately 40-60 g - flower centers and petal outlines
- Total: approximately 220-270 g
The exact amount will vary according to yarn brand, tension, and finished size.