
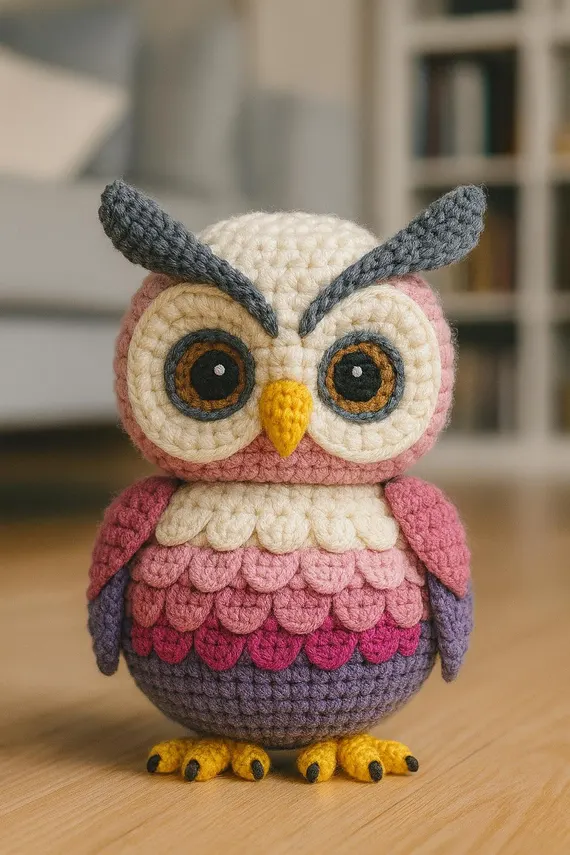
Free Crochet Owl Pattern - Chunky Layered-Eye Owl
Materials and Tools
Yarn
Use worsted-weight cotton/acrylic blend yarn with a firm, well-defined stitch texture.
- Cream: 100-120 g - head, eye patches, upper chest
- Dusty Pink: 70-90 g - head/body background and upper feather tiers
- Deep Pink: 25-35 g - lower feather tiers
- Purple: 45-55 g - lower body and wings
- Dark Grey: 15-20 g - eyebrows, eye borders, wing accents
- Warm Brown: 10-15 g - iris rings
- Bright Yellow/Golden Orange: 15-20 g - beak and feet
- Black: small amount for embroidered claw tips and eye details
Tools
- 3.5 mm crochet hook, or size needed to obtain a firm fabric
- 12 mm black safety eyes
- Fiberfill stuffing
- Yarn needle
- Stitch marker
- Scissors
- Optional locking stitch markers
- Optional small amount of white embroidery thread for eye highlights
Finished size: approximately 9-10 in (23-25 cm) tall when made with worsted-weight yarn and a tight amigurumi tension.
Important: Crochet amigurumi pieces tightly. The stuffing should not be visible through the stitches.
Abbreviations
US crochet terminology:
- MR - magic ring
- ch - chain
- sc - single crochet
- hdc - half double crochet
- dc - double crochet
- inc - increase, 2 sc in the same stitch
- dec - invisible decrease
- sl st - slip stitch
- BLO - back loop only
- FLO - front loop only
- st/sts - stitch/stitches
- FO - fasten off
- Shell - 5 dc worked into the same stitch
- Crocodile/Scale Stitch - overlapping scale-shaped cluster made around dc posts
- R - round
- RS - right side
Pattern Notes
- Work the body in continuous spirals unless otherwise stated.
- Use a stitch marker to identify the first stitch of each round.
- The eye patches, beak, eyebrows, wings, and feet are worked separately and sewn on.
- The feather scallops are crocheted as decorative overlay rounds through selected front loops.
- When changing colors in amigurumi, make the final yarn-over of the last stitch with the new color for a clean transition.
Part 1: Large Layered Eyes and Beak
The owl's oversized eyes are constructed from several concentric layers. Make 2 complete eyes.
A. Cream Eye Patch
With Cream:
R1: 6 sc in MR. (6)
R2: inc around. (12)
R3: (sc, inc) x 6. (18)
R4: (2 sc, inc) x 6. (24)
R5: (3 sc, inc) x 6. (30)
R6: (4 sc, inc) x 6. (36)
R7: (5 sc, inc) x 6. (42)
R8: sc around. (42)
Sl st, FO, and leave a long sewing tail.
This creates the large cream facial disc visible around each eye.
B. Dark Grey Eye Border
With Dark Grey, make a second circle.
R1: 6 sc in MR. (6)
R2: inc around. (12)
R3: (sc, inc) x 6. (18)
R4: (2 sc, inc) x 6. (24)
R5: (3 sc, inc) x 6. (30)
R6: (4 sc, inc) x 6. (36)
R7: (5 sc, inc) x 6. (42)
FO, leaving a sewing tail.
Place this grey disc behind the cream disc so approximately 2-3 rounds of grey remain visible around the outside.
Sew the cream layer securely over the grey layer.
C. Warm Brown Iris
With Warm Brown:
R1: 6 sc in MR. (6)
R2: inc around. (12)
R3: (sc, inc) x 6. (18)
R4: (2 sc, inc) x 6. (24)
R5: (3 sc, inc) x 6. (30)
FO, leaving a long tail.
Position the brown iris approximately in the center of the cream eye patch.
Sew it down neatly.
D. Safety Eye
Insert one 12 mm black safety eye through the center of the brown iris.
The eye should sit slightly below the horizontal center of the face rather than directly against the upper edge.
Secure the washer firmly on the back.
Repeat the complete eye construction for the second eye.
Optional White Eye Highlight
Using white embroidery thread, add a tiny 2-3 stitch highlight near the upper-right portion of each safety eye.
Keep both highlights at approximately the same angle.
Beak
The beak is a small three-dimensional pointed diamond.
With Golden Yellow:
R1: 4 sc in MR. (4)
R2: (sc, inc) x 2. (6)
R3: sc around. (6)
R4: (2 sc, inc) x 2. (8)
R5: sc around. (8)
R6: (2 sc, dec) x 2. (6)
Lightly stuff.
R7: (sc, dec) x 2. (4)
FO and use the remaining yarn to close the opening.
Pull the beak gently into a tapered point.
Set aside for assembly.
Part 2: Eyebrows / Head Crest
The characteristic dark-grey V-shaped brow is made as two connected feathered strips.
Make 2 strips.
With Dark Grey, leave a long starting tail.
R1: ch 4.
R2: Starting in 2nd ch from hook, sc 3. (3)
R3: ch 1, turn, inc, sc, inc. (5)
R4: ch 1, turn, sc across. (5)
R5: ch 1, turn, inc, sc 3, inc. (7)
R6: ch 1, turn, sc across. (7)
R7: ch 1, turn, inc, sc 5, inc. (9)
R8: ch 1, turn, sc across. (9)
R9: ch 1, turn, dec, sc 5, dec. (7)
R10: ch 1, turn, sc across. (7)
R11: ch 1, turn, dec, sc 3, dec. (5)
R12: ch 1, turn, sc across. (5)
R13: ch 1, turn, dec, sc, dec. (3)
R14: ch 1, turn, dec, sc. (2)
R15: ch 1, turn, dec. (1)
FO.
Shape the Brow
Do not leave the strip completely flat.
Using the yarn tail, gently curve the wider end upward and slightly backward.
Make the second strip in the same way.
Position the two strips diagonally so their inner ends meet above the beak and the outer ends sweep upward toward the sides of the head.
Sew the inner ends together first.
Then tack each eyebrow down at several points.
This creates the distinctive raised V-shaped unibrow/crest rather than a flat straight line.
Part 3: Main Body and Head
The owl is crocheted as one structured amigurumi form from the bottom upward.
The body begins rounded and wide, narrows slightly at the neck, then expands again into the large head.
Main Body
Begin with Purple.
Lower Body
R1: 6 sc in MR. (6)
R2: inc around. (12)
R3: (sc, inc) x 6. (18)
R4: (2 sc, inc) x 6. (24)
R5: (3 sc, inc) x 6. (30)
R6: (4 sc, inc) x 6. (36)
R7: (5 sc, inc) x 6. (42)
R8: (6 sc, inc) x 6. (48)
R9-R14: sc around. (48)
At this point the owl has reached its maximum lower-body circumference.
Lower Feather Tier
The purple body is decorated with overlapping feather/scallop shapes.
These are worked into the front loops of R13.
Attach Deep Pink to the first available front loop of R13.
For each 6th front loop:
Feather: 5 dc in the same front loop, then sl st into the next 5 front loops.
Continue around.
You will create 8 large overlapping scallops around the body.
FO.
Important
The decorative shells sit on top of the purple body. Do not count the dc stitches as part of the underlying body stitch count.
The underlying body remains 48 stitches.
Deep Pink Feather Band
Continue the body with Deep Pink.
R15-R18: sc around. (48)
Work another feather tier into the FLO of R17.
Attach Deep Pink and work:
[5 dc in next front loop, sl st in next 5 front loops] around.
This produces another ring of rounded feathers.
Dusty Pink Feather Band
Change to Dusty Pink.
R19-R22: sc around. (48)
Work the next feather tier into the FLO of R21:
[5 dc in next front loop, sl st in next 5 front loops] around.
The scallops should overlap the previous row slightly.
Cream Upper Chest
Change to Cream.
R23-R27: sc around. (48)
The cream section forms the owl's fluffy upper chest.
For a more pronounced feathered edge, work a final cream scallop row into the FLO of R26:
[5 dc in next front loop, sl st in next 5 front loops] around.
FO the decorative strand if necessary.
Neck Shaping
Return to the main body using Dusty Pink.
R28: (6 sc, dec) x 6. (42)
R29: sc around. (42)
R30: (5 sc, dec) x 6. (36)
R31: sc around. (36)
This slight reduction creates the narrower neck visible underneath the owl's large head.
Head
Change to Dusty Pink.
R32: (5 sc, inc) x 6. (42)
R33: (6 sc, inc) x 6. (48)
R34-R43: sc around. (48)
Begin stuffing firmly as you work.
Head Color Blocking
The head remains primarily Dusty Pink.
The large cream eye patches will cover most of the front, creating the characteristic cream-and-pink owl face shown in the photograph.
Add stuffing gradually rather than filling the head all at once.
The head should be rounded and slightly wider than the neck.
Crown Shaping
R44: (6 sc, dec) x 6. (42)
R45: (5 sc, dec) x 6. (36)
R46: (4 sc, dec) x 6. (30)
R47: (3 sc, dec) x 6. (24)
Add the final stuffing.
R48: (2 sc, dec) x 6. (18)
R49: (sc, dec) x 6. (12)
R50: dec around. (6)
FO.
Using a yarn needle, weave through the remaining 6 stitches and pull tightly closed.
Weave the tail inside the body.
Chest Feather Construction
The body should have clearly separated horizontal feather tiers rather than a single flat color change.
For the most dimensional result:
- Keep the cream chest as the highest feather layer.
- Place the dusty-pink scallops directly beneath it.
- Place the deep-pink scallops beneath the dusty-pink tier.
- Keep the purple lower body visible underneath.
- Allow each scallop to overlap the row immediately below it.
Each 5-dc shell should remain rounded rather than being flattened during sewing or blocking.
Part 4: Wings and Small Claws
Wings
Make 2 wings.
The wings are elongated teardrops with a slightly curved outer edge.
Begin with Purple.
R1: ch 2, 3 sc in 2nd ch from hook. (3)
R2: ch 1, turn, inc, sc, inc. (5)
R3: ch 1, turn, sc across. (5)
R4: ch 1, turn, inc, sc 3, inc. (7)
R5: sc across. (7)
R6: inc, sc 5, inc. (9)
R7: sc across. (9)
Change to Deep Pink.
R8: inc, sc 7, inc. (11)
R9: sc across. (11)
Change to Dusty Pink.
R10: inc, sc 9, inc. (13)
R11: sc across. (13)
R12: dec, sc 9, dec. (11)
R13: dec, sc 7, dec. (9)
Change to Dark Grey.
R14: dec, sc 5, dec. (7)
R15: dec, sc 3, dec. (5)
R16: dec, sc, dec. (3)
R17: dec, sc. (2)
R18: dec. (1)
FO.
Weave in the tail.
Wing Shaping
Lightly steam or wet-block only if necessary.
Do not flatten the wing completely.
The lower dark section should taper into a narrow point.
Repeat for the second wing.
Wing Feather Detailing
Using Dusty Pink or Deep Pink, add three small decorative scallops along the upper wing.
For each scallop:
- Insert the hook around the selected stitch.
- Pull up a loop.
- Work 5 dc in the same point.
- Sl st into the next stitch.
Space the scallops progressively toward the wing tip.
This gives the wings the layered feather appearance seen in the reference.
Small Yellow Feet
Make 2 feet.
Each foot consists of a small ankle section and three separate toes.
Ankle
With Golden Yellow:
R1: 6 sc in MR. (6)
R2: sc around. (6)
R3: (sc, inc) x 3. (9)
R4-R5: sc around. (9)
Lightly stuff.
FO, leaving a long sewing tail.
Toes
Make 6 toes total, three per foot.
For each toe, with Golden Yellow:
R1: 5 sc in MR. (5)
R2-R4: sc around. (5)
Do not stuff heavily.
Flatten the toe slightly.
FO and leave a long sewing tail.
Sew three toes to the front of each ankle, spreading them outward like small owl claws.
Toe Arrangement
For each foot:
- One toe points slightly forward.
- One toe angles outward.
- One toe angles in the opposite direction.
This prevents the feet from looking like three straight tubes.
Black Claw Tips
With black embroidery thread, wrap or embroider 2-3 small stitches around the end of each yellow toe.
Keep the black markings small.
They should look like dark claw tips rather than entire black toes.
Assembly and Detailing Guide
1. Attach the Eye Layers
Lay the two completed eye patches onto the front of the head.
Position them symmetrically.
The inner edges should almost touch on either side of the beak.
The lower edges should sit approximately one-third of the way down the head.
Sew the cream eye patches securely through their outer rounds.
Avoid stitching across the center of the eye.
2. Position the Brown Irises
The brown iris should sit toward the center of each cream patch.
Check the owl from straight ahead before sewing.
Both eyes should have the same height and angle.
Sew around the brown iris if necessary to prevent the layered disc from shifting.
3. Attach the Beak
Center the yellow beak directly between the two eyes.
The wide portion should sit against the face.
The pointed end should project slightly forward and downward.
Sew around the base securely.
Add a few horizontal yellow stitches at the base if you want a more defined upper-beak ridge.
4. Attach the V-Shaped Eyebrows
Place the two dark-grey brow pieces above the eyes.
Their inner ends should meet just above the beak.
Angle each piece upward toward the outer sides of the head.
The outer ends should point upward, producing the dramatic feathered V silhouette.
Sew only along strategic points so the brows retain a slightly raised, expressive appearance.
5. Position the Wings
Place one wing on each side of the body.
The top of each wing should begin approximately at the transition between the head and cream chest.
The widest section should sit beside the pink feather tiers.
The pointed dark-grey end should reach approximately to the lower third of the body.
Sew around the outer edge using matching purple yarn.
Add a few hidden stitches through the center of the wing to prevent excessive movement.
6. Attach the Feet
Position both yellow feet beneath the purple body.
The ankles should be centered underneath the lower body.
Before sewing permanently, place the owl upright on a flat surface.
Adjust the feet until the owl stands naturally.
Sew the ankles firmly to the underside.
Spread the three toes outward.
7. Shape the Body
Before completing the final yarn weaving:
- Check that the body is evenly stuffed.
- Push additional fiberfill into the lower sides if necessary.
- Shape the head into a rounded rectangle rather than a perfect sphere.
- Slightly flatten the bottom so the owl can stand.
- Make sure the cream chest remains centered.
Avoid overstuffing the neck, as this can make the head look detached from the body.
Final Finishing Details
- Use a yarn needle to hide every remaining yarn tail inside the body.
- Pull tails through several stitches before trimming.
- Check all safety-eye washers from the inside.
- Make sure the two eyes are level.
- Keep the eyebrows symmetrical but slightly curved.
- Gently arrange each scallop so the feather tiers remain visibly separated.
- Use your fingers to round each 5-dc shell.
- Check that the wings angle slightly forward rather than lying completely flat.
- Position the black claw-tip embroidery consistently on all six toes.
The finished owl should have a large rounded pink-and-cream head, oversized layered eyes, a dramatic dark-grey V-shaped brow, a tiny golden beak, a cream-to-pink-to-purple tiered feathered chest, tapered wings, and three-toed golden feet for the characteristic chunky amigurumi silhouette.
Realistic Labrador Amigurumi Crochet Pattern
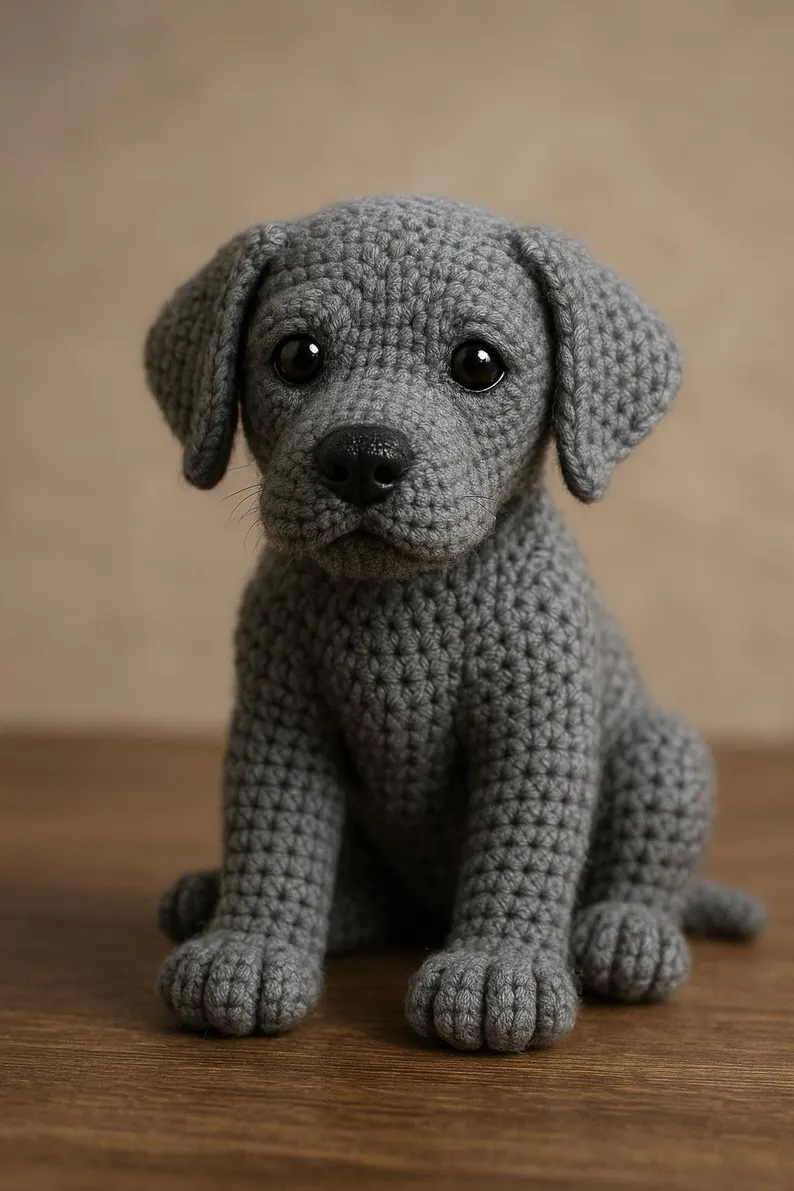
Realistic Labrador Amigurumi Crochet Pattern - Life-Like Sitting Puppy
Amigurumi Puppy
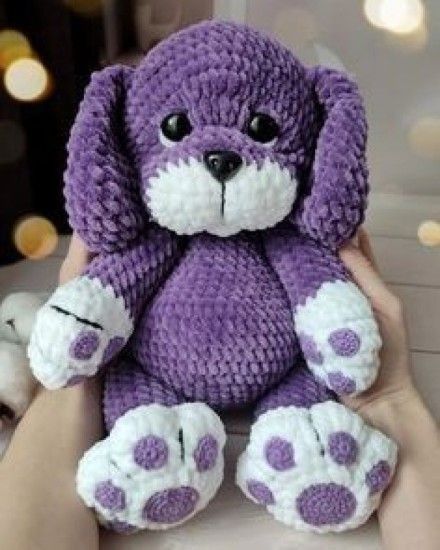
Create an irresistibly cuddly Amigurumi Puppy Crochet Pattern inspired by the adorable plush puppy shown in the photo. This chubby puppy features a deep violet body, oversized floppy ears, a soft white muzzle, and large white paws decorated with contrasting purple paw pads.
The pattern uses super bulky chenille yarn and is designed for advanced beginners who are comfortable crocheting amigurumi in continuous rounds, changing colors, increasing, decreasing, and sewing simple pieces together.
Free dragon crochet pattern
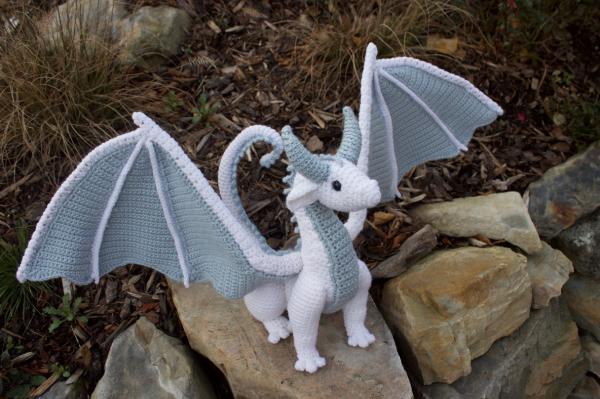
Free Dragon Crochet Pattern - Majestic Fantasy Dragon with Posable Ribbed Wings
African flower crochet elephant free pattern
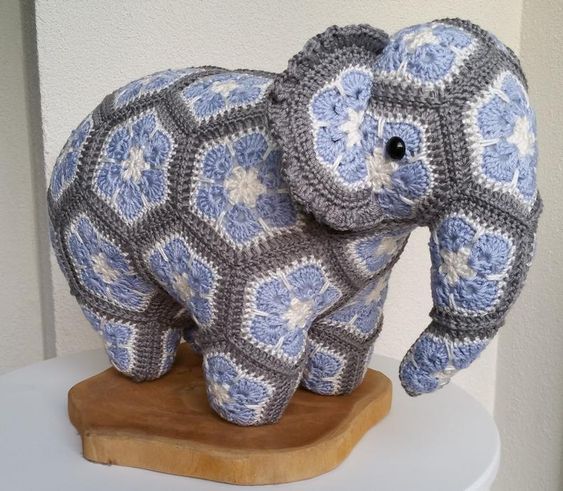
Materials and Tools
Yarn
Use a smooth, tightly spun sport or DK-weight cotton/cotton-blend yarn so the motifs remain crisp after joining and stuffing.
- Gray: approximately 100-120 g - outer framing, joining, and structural seams
- Light blue: approximately 70-90 g - flower petals
- Cream/white: approximately 40-60 g - flower centers and petal outlines
- Total: approximately 220-270 g
The exact amount will vary according to yarn brand, tension, and finished size.